Braving Darkness to See the Light
How—and why—to take a nighttime astro hike


Iconic trails, vistas, and attractions like Yosemite National Park’s Glacier Point and Zion’s Observation Point offer transporting experiences that can further connect you to Earth and remind you of your place in the world. That is, until a gaggle of screaming teenagers flouting social distancing guidelines disrupts your chi. In true millennial fashion, I’ve discovered a hack: Show up in the middle of the night.
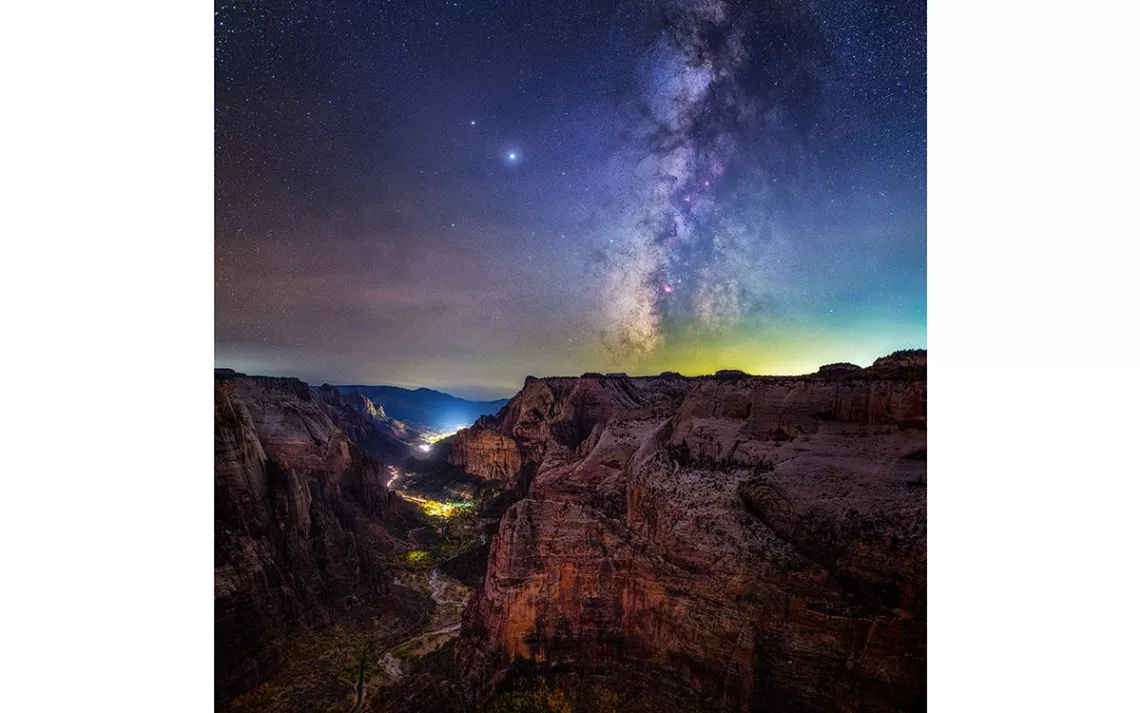
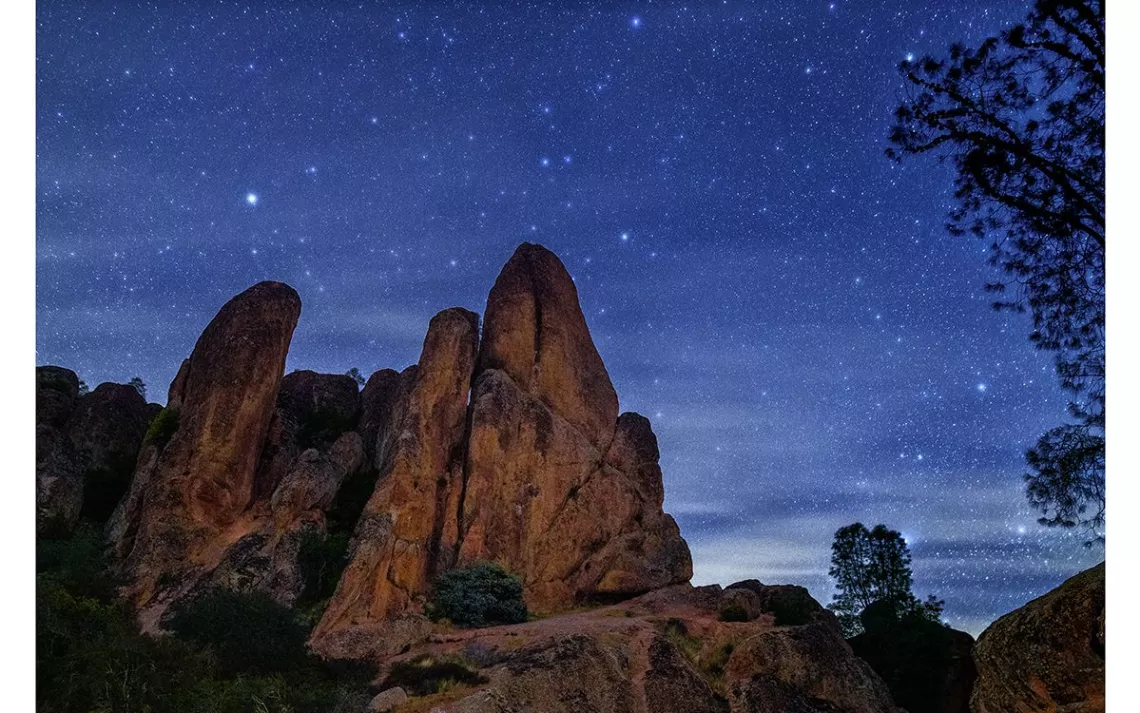
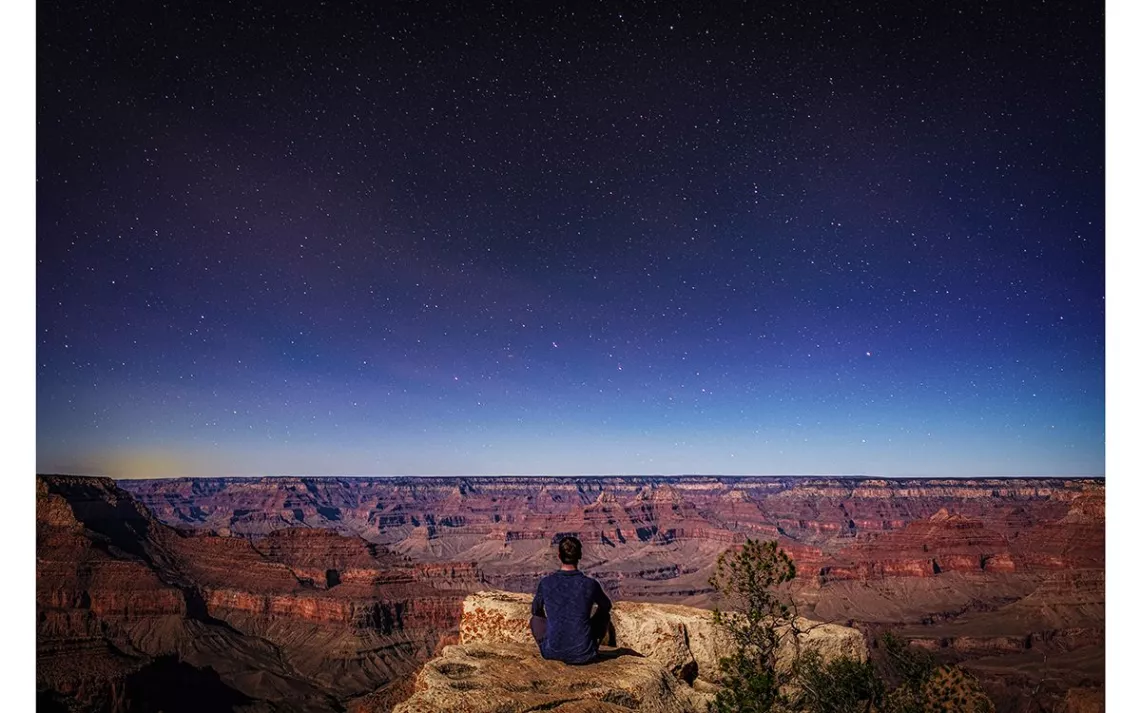
I first had this realization when I visited Yavapai Point at the Grand Canyon to photograph the night sky. It was my first photo trip after deciding to attempt the uncommon leap from deep-sky astrophotography (shooting galaxies and nebulae through a telescope) to landscape astrophotography (capturing scenic vistas with stars overhead). I set up my tripod and camera among throngs of unruly sunset-seekers and wondered whether any would stick around for the stars. Most people didn’t last 10 minutes past sunset, and within 45 minutes, I was the only person left. I had the Grand Canyon and the universe overhead to myself for the next three hours, and it was spectacular. It felt like I was standing in an empty stadium, watching a show made just for me.
Night hiking was an odd hobby for someone like me to stumble upon—it all started in 2016 and had nothing to do with hiking or even photography. I'd purchased a telescope to feed a growing interest in astronomy and felt a twinge of disappointment whenever I took a look, because all the galaxies looked like pale white splotches instead of the vibrant spirals you see on motivational posters. I quickly realized the pictures look that way because they’re pictures. Turns out you need a camera and a lot of technical skill to overcome the limitations of your retinas. So I delved into deep-sky astrophotography—an endless world of camera physics, optics, telescope mounts, and imaging software. A couple years into my quest to see more details through my telescope, I realized that all this knowledge had made me more of a photographer than an astronomer. I got curious about other types of photography and eventually decided to try my hand shooting the stars and ground in the same image. So, I went to the Grand Canyon.
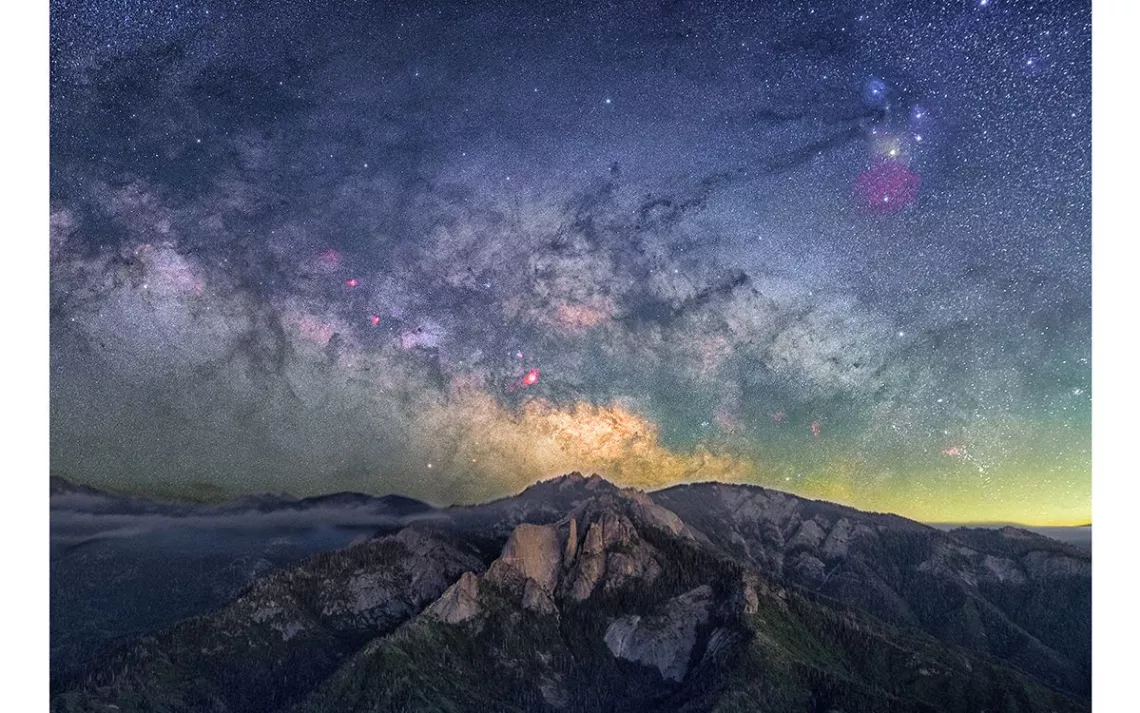
Since then, I’ve grown to crave the dark stillness of America’s greatest natural theaters and have spent a lot of time hiking in the dead of night to reach its most quintessential vistas. There, I get to appreciate prehistoric geologic features shimmering in the faint glow of ancient photons from the farthest reaches of the galaxy and somehow feel a part of both worlds at the same time. The once-profound depth of my inner universe shrinks at the altar of the cosmos; I become part of something much larger. Sometimes, I find myself wondering why these places are so desolate at night. This is when they’re at their best.
Then I remember: Most people sleep at night and aren’t obsessed with astrophotography. But on the off chance you’d like to hike several miles in the dark to try your hand at landscape astrophotography, or simply savor the unique satisfaction of staring into a dark, quiet void, please read on for my advice on how to plan and execute a night hike to optimally appreciate the sky.
1. Prepare for disappointment.
You can't see beautiful vistas as well at night. Internalize this.
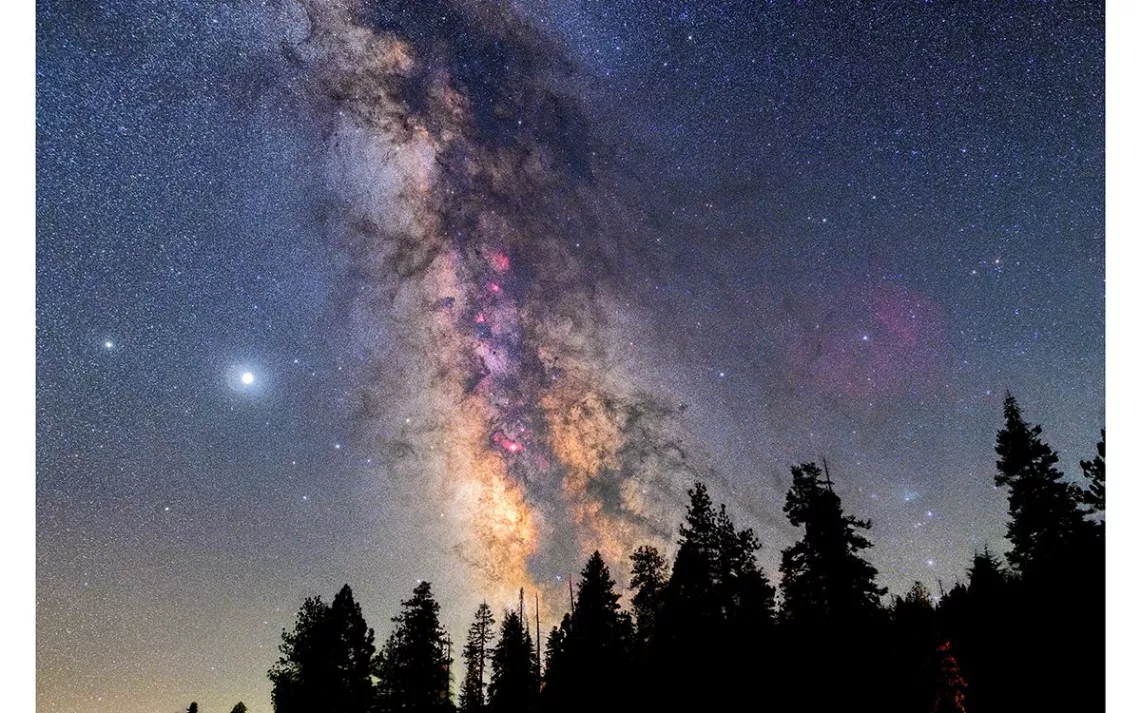
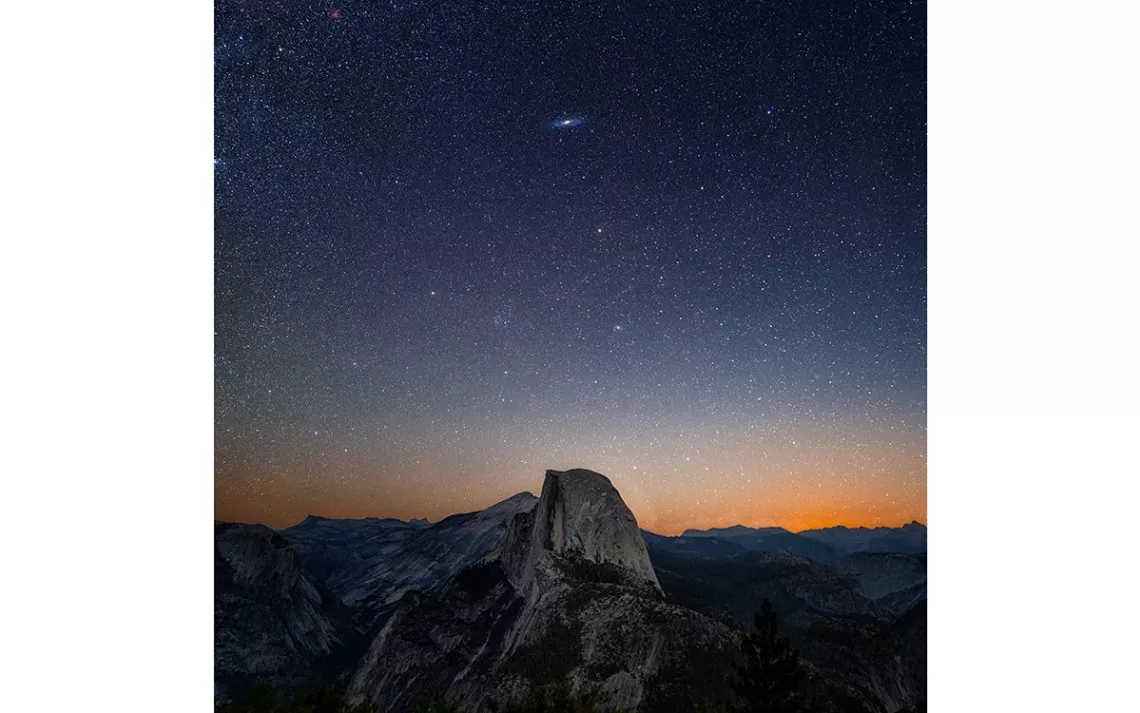
Images of the Milky Way rising over your favorite national park can be beautiful and awe-inspiring; however, you’ll quickly learn that your puny pupils and underpowered retinas are no match for a 24mm f/1.4 lens, a 240 second exposure time, and several hours in front of a computer. Your biology is simply not equipped to take in this kind of grandeur. At best, your eyes are suited for traversing moonlit plains, or at worst, for triggering the abject terror that accompanies the sight of gleaming eyes in a dark forest. Often, after a multimile hike, the only indication you’ve reached your destination is the sudden and uncomfortable sensation of being overexposed. Your first thought upon summiting that quintessential vista in the dark may be that you could have simply looked at the Milky Way from your campsite. You’d be right (but only if you ignore the next point).
2. Practice your hike in the daytime.
Come nightfall, landmarks evaporate, forks in the trail become elusive, and you may very well walk right past that iconic vista and never know it. Practicing your hike in the daytime may seem like a waste of time, but it provides valuable safety information. Make special note of landmarks that appear within two to three feet of the trail; your headlamp won’t shine as far as you think, and at 1 A.M., you’ll never see the giant boulder 100 feet off the trail that orients most daytime visitors.
What’s more, practicing your hike in daytime will provide you with the context necessary to appreciate the views you encounter after dark. Your mind will internalize the vistas and fill in the blanks, allowing you to genuinely appreciate what a lowly speck you are in the face of the immensity of creation.
3. Be afraid of the dark.
The desert has snakes and scorpions. The forest has bears and coyotes. Even the California coast has mountain lions. They all see better in the dark than you.
Familiarize yourself with the terrifying creepy-crawlies and teeth-gnashers that come out at night in the area you plan to hike. Also familiarize yourself with strategies to deal with such threats, and remember—if you do this long enough, you will eventually stumble upon a nocturnal creature with deadly potential. My girlfriend, Katie, and I learned this the hard way in Sequoia National Park during a surprise 1 A.M. encounter with a black bear who appeared fewer than 10 feet distant, munching on a post-midnight snack. Part of the reason that we weren’t that snack may have boiled down to our time spent reviewing various “How to Not Get Eaten by a Bear'' videos prior to our trip (hint: scream at them).
Also keep in mind that many creatures on the trail are fearful of you too, and for good reason. Just as in daytime, we are visitors in the wilderness, and it behooves us to be mindful of our impact on the ecosystem. Human incursions into nature have been shown to negatively impact animal behavior and reproduction. These same critters inhabit the woods at night, so watch your step and try not to disturb any wildlife.
If all else fails, just remember that most glowing green eyes belong to deer. Until they don't.
4. Don’t fall off a cliff.
Mountains are lousy with cliffs, and you can easily approach the edge of one at night without knowing it. Invest in a bright, high-quality headlamp, and make sure to switch out for fresh batteries before every hike. Bring spares with you too. (The best headlamps are very bright but burn through batteries quickly.) The more visibility you have on the trail, the better. Also look for a headlamp with a red-light setting, for use when you arrive at your destination; red light preserves your night vision and can help you safely navigate the mountaintop while still appreciating the sky.
Bring a walking stick or hiking pole and watch your step. This is great advice on any hike, for hikers of any age, but at night, it can be especially helpful to have this extra measure of balance and support. Thankfully, night hiking offers fewer visual distractions while on the trail, so there isn’t much to focus on other than your footing.
5. Plan your hike on Google Earth.
This applies more to astrophotographers than to hikers, but I find Google Earth to be one of the most helpful ways to plan hikes and scout out images. I usually turn on Street View and scan the map for places where users have posted their own 360-degree images (which appear as blue dots). People tend to upload such images from iconic landscapes, which means there is usually something interesting to see in such locations. In most cases, the more blue dots, the better the view.
However, not all vistas make for good photos—you need to know a thing or two about the sky before you hit the trail.
6. Know the moon phase and location of the Milky Way.
The trouble with Earth is that it won’t stay still: It spins like a top, faster than the speed of sound, and travels 584 million miles a year in its orbit around the sun. Meanwhile, the moon revolves around us once a month. As a result, the same vista will look radically different depending on the time of night, time of year, and time of month. For astrophotographers, this means planning images and hikes based on our knowledge of the sky on the night in question, and of the direction the vista faces. The Milky Way may not get into the right position until 3 A.M., meaning the hike needs to start at 1 A.M. So if it’s stellar imagery you’re after, have some coffee before setting out, or be prepared to plan your hike to take place a few months down the line.
Non-photographers take note: If there’s a full moon out during your night hike, you’ll never see the Milky Way, no matter where you are. The moon brightens the sky by a factor of 100 to 1,000 (depending on how close to the moon you look), performing the same role, essentially, as city lights. In fact, any moon at all will significantly detract from your view of the stars and Milky Way (though it will dramatically illuminate the landscape, which is beautiful in its own right), and so you should plan accordingly. Reaching your destination just before moonset, or moonrise, is a great way to enjoy the best of both worlds.
Apps like Sky Safari (beginner and advanced) and Starwalk (beginner) are great for learning where celestial objects like the moon and Milky Way will be, and PhotoPills’ Augmented Reality feature is well worth the cost for photographers who want to plan Milky Way shots on-site. Planning ahead can dramatically increase your bang-for-buck (the buck being a very likely cold, sleepy, mildly terrifying night hike).
7. Check the weather.
Duh.
8. Don’t get lost.
The risk of twisting an ankle or becoming lost increases dramatically at night, and a quick two-miler just after sunset can suddenly morph into an overnight ordeal.
Be prepared for this possibility by letting friends and family know your plans and bringing along emergency supplies like a first-aid kit, extra food and water, and warm clothing. Make sure your cellphone is charged and placed in battery-saver mode. Geotag both your vehicle and destination using pins before setting out.
9. Read these tips from my girlfriend.
Shockingly, the kinetic excitement of long-exposure astrophotography may not be enough to keep your fellow hikers warm and wide-awake throughout the adventure, and they may need additional creature comforts, such as
-
Extra blankets
-
An iPad with a Kindle for reading
-
Caffeinated beverages
-
Gloves, hats, parkas, leggings, neck warmers, scarves, and Snuggies
-
Hand warmers
-
A phone
-
A healthy skepticism of the phrase “just one more exposure”
Well that’s about it. Have fun, and don’t die out there.