3 Simple Clothing Repairs You Can Do Right Now
It’s remarkably easy to extend the life of your garments
Photos by Elizabeth L. Cline
Whether you’re spring cleaning or self-quarantining, it’s a great time to finally tackle that pile of clothing repairs, from those ripped knees to your loose button. Repairing clothes can be intimidating at first, with as many as 60 percent of UK residents and many American millennials saying they never learned how to sew. Lacking this basic life-skill, too many people end up tossing fixable clothes in the trash. Nearly 17 million tons of textiles are thrown out in the US each year. Contrary to popular belief, repairing your clothing doesn’t require master-level sewing skills, and it can be easy and satisfying. These three simple repairs are a breeze and demand no prior experience.
In terms of supplies, all you need are a needle and thread, a pair of scissors, and, if you’ve got them, some straight pins. Know how to thread a needle and tie off your thread before you start; YouTube is a fantastic resource for videos of these fundamentals.
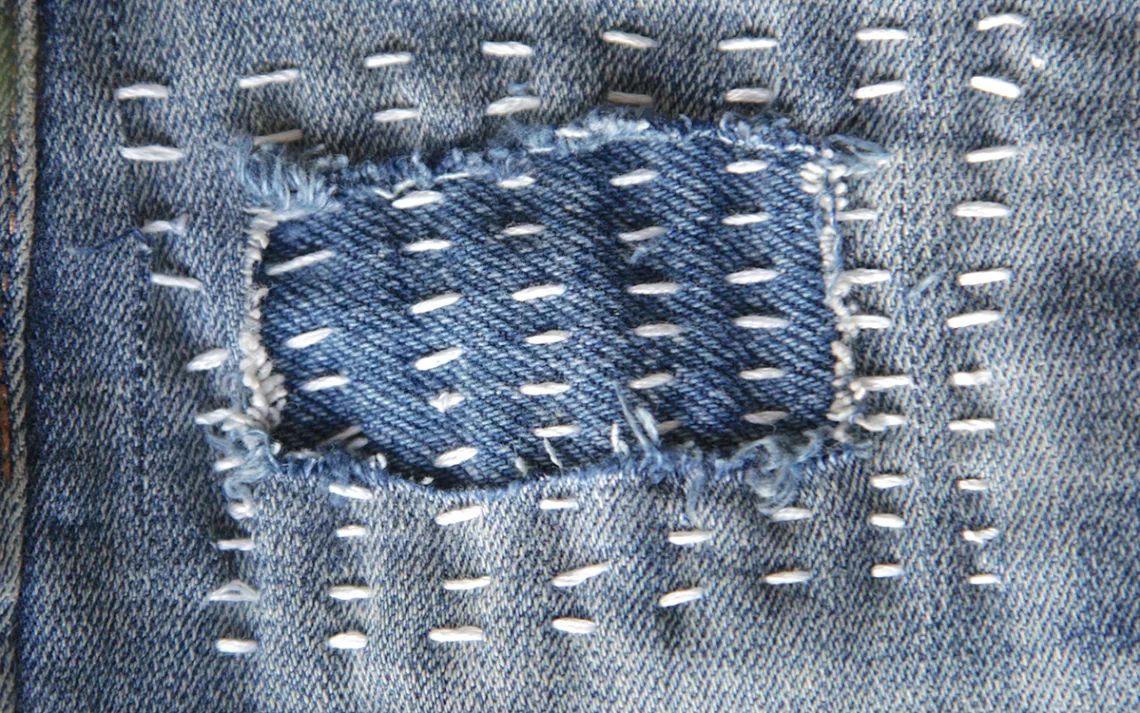
Patch Up a Tear in Jeans

Setup and supplies: This simple patch is for knees and other rips in your denim. You’ll need a scrap piece of denim or canvas cloth for your patch. You can cut up an old, irreparable pair of jeans or a canvas tote bag (the fabric needs to be sturdy and not too stretchy). If you want your patch to blend in (a good idea if you’re repairing the crotch or inner thigh area), choose a denim and thread that closely match the color of the jeans. Here, though, I decided to use bold white thread to add a fun design element inspired by Japanese sashiko mending (see social media for inspiration). It can help to have a thimble to protect your finger as you push the needle through stiff denim. Or, improvise one out of duct tape.
1. Cut your patch material about 1.5" bigger than the hole all around. Place the patch material on the inside of your jeans with the right side of the material facing out and through the hole. Cut any frayed threads around your hole to make a nice neat edge, and pin your patch in place using straight pins. Or, secure your patch using a few loose, long temporary stitches on the corners (known as "tacking"). You’ll cut the threads out when you’re done patching.
2. Before you get started, practice stitching on a scrap piece of cloth or an old dish towel. For this sashiko-inspired patch, I like to use a running stitch, a super-easy stitch that involves pushing the needle up and down, up and down through the fabric, creating an evenly spaced dashed line. If you get stuck, check YouTube for the fundamentals. Your stitches should be about ¼" in length and ¼" inch apart. If you want your lines and stitches to be perfectly even, use a white fabric pencil to create an outline first.
3. It’s time to get stitching! Start your running stitch at one far corner of your patch. Come up through the back of the fabric and weave your needle up and down. You can make multiple stitches at once by bunching the fabric up on your needle. Be careful to keep bits of fabric separated and not sew one side of your jeans to the other or to the pocket!

4. At the end of each row, turn the corner on the back side of the fabric and sew a new line back across the patch in the opposite direction. Repeat back and forth, keeping an equal amount of space between each row. If your fabric starts to pucker or gather, pull it back apart so that it lays flat. When you get to the hole, just keep stitching right across it.
5. When you finally sew to the end of your patch, push your needle to the back of your garment, tie a knot in your thread, and clip the loose ends. Launder and wear as normal.
Darn a Hole in a Sock

Setup and supplies: Perhaps your big toe rubbed a hole through your sock or a moth chomped your sweater. Holes in knitwear are inevitable and can easily be repaired by darning. This tutorial is demonstrated on a sock, but darning is ideal for sweaters, T-shirts, and any kind of knit. Darning involves reweaving the thin spots and the fabric to cover a hole. It’s easier than it sounds and mostly requires patience and a basic up-down stitch. Practice on a sock before graduating to your favorite cashmere sweater. Typically, a darning egg is used to stretch the fabric and secure it in place while you do your repair. But these stand-ins work just as well: A tennis ball, the bottom of a cup, or a thick plastic LED lightbulb that won’t shatter. It helps to sit in very bright light so you can clearly see all your stitches.
Use a thread that’s the same weight and color as the fabric (for example, a chunky blue wool yarn to fix a chunky blue wool sweater). Or, if you want to add a fun design element to your knits, use a contrasting thread to make your mend stand out.

1. Slip your garment or sock over your darning egg stand-in, centering the hole over the widest part, and pull the fabric taut but not tight, or it’ll pucker when you’re done. Let’s get to stitching! Bring your needle up through the back of the fabric a good distance away from the hole and just beyond the thin spots around it. Darning reinforces weak spots while also covering the hole. Your stitches should be roughly similar in length and spacing to the original weave of your material. If it’s a tight weave, use tight stitches, and vice versa. Don’t worry about tying off a knot, as the tail of your thread will weave naturally into the material.

2. Stitch up and down in a straight line, keeping your stitches nice and even. Then go back in the opposite direction, trying to stagger or alternate your stitches. When you finally approach the hole, make a long stitch that stretches straight across it, ensuring there’s no slack. You will weave under and over these threads in just a moment. Continue to stitch all the way across the hole and beyond it, until you are as far on the other side as where you started.


3. Turn your garment 90 degrees. You are now going to stitch at a right angle to your original rows of stitches, pushing your needle over and under your original stitches, re-creating the weave of the original garment. When you get to the hole, weave under and over the threads from your first pass. Make sure to alternate stitches and your new fabric will start to take shape. The stitches over the hole should be very close together; you can also use the eye of your needle to push them together. Keep stitching beyond the hole until you’ve reached the end of the darn. Weave the tail of your fabric into your garment, clip the thread off on the inside of the garment, and you’re done.
Sew on a Button

Setup and supplies: This is a basic life-skill that everyone should know. If you’ve been avoiding sewing on a button because you don't have a good replacement, don’t let that stop you. Simply replace all of the buttons on your shirt or jacket. You can find buttons online or in a sewing shop. Each button is slightly different; these instructions are for a four-button hole using a cross-shaped stitch. What’s important is to match your stitching to the other buttons on your garment (checking out the other buttons will also help you figure out how to sew the new one on correctly).
1. Thread a needle with about two feet of thread in a color that matches the thread used on the other buttons, and pull both ends together away from the needle. Tie a knot where they meet. Look for the tiny holes or thread in the fabric of your garment to find the exact spot where the button used to be. Use a fabric pencil or a pen to make a small dot where your new button will sit.
2. Make a few stitches over the dot in an X shape. This will form a strong foundation for your button and make it easier to sew the button on in the exact right spot.

3. Now, push your needle up through the back of your garment, through the X, and up through the hole of one side of the button. Then, cross your needle and thread across the top of your button and come back down through the hole diagonal to the one you came up through. Continue on, pushing the needle back down through the fabric and the X, leaving a little bit of thread length between the button and your fabric. This is where you’ll make a shank to leave space for your garment to close.

4. Repeat step 3 four more times, looping your thread in a diagonal direction across the top of your button and back down through the X.

5. You’re halfway done. It’s time to switch sides on your button and repeat the steps again. Come up through one of the empty holes on the other side of the button and pass your needle diagonally across the button to the one hole that you haven’t passed through yet. You will now have a criss-cross shape of thread across the top of your button. Repeat this step four more times.

6. With your needle at the back of the fabric, come back up through the X on the base of your garment, but don’t go up through the button. Wind your thread three or four times around the threads that are just underneath the button. This forms your “shank,” a bundle of threads that help secure your button.
7. Push the needle back down through the fabric and the X and tie off a knot. You’re all done!