How to Build Your Own Compostable Toilet
Here's a step-by-step guide to not wasting your waste, in style

Photo courtesy Kelsey McWilliams
Pull the silvery lever, plop the lid, and whoosh—whatever you left behind swirls down the drain, out of sight and out of mind. Our flush toilets are utterly convenient, but they are thirsty water-guzzlers, and they don’t return our metabolic output back to the earth, which is crucial for circular ecology. They are essentially wasting our waste, which is high in nutrients plants love, such as nitrogen, phosphorus, and potassium.
As someone who grew up on a small family farm where every scrap of waste—whether plant or human—was diligently composted, I share that sentiment. Every fall, my grandfather would don his sturdy overalls and heavy-duty gloves and empty out our septic system onto the land, one bucket at a time. We could have called a service to do this, but my grandfather wouldn’t let all these riches go to waste. He poured the gunk into his rotating composting pits, adding in fallen leaves, dead plants, kitchen scraps, and other organic refuse and closed them up. When he opened them again three years later in the spring, all of the biomass was gone, transformed into rich black dirt, full of chubby, wiggling worms. Today we call this method circular sanitation or circular agriculture, meaning that we return the nutrients back to land, perpetuating the cycle, but for my grandfather it was simply a way of life. “You have to feed the earth the way you feed people,” he used to say. I grew up thinking that everyone lived the same way—until I learned otherwise. Years later, I wrote an entire book arguing for a more sustainable use of our metabolic output. Titled The Other Dark Matter: The Science and Business of Turning Waste Into Wealth and Health, it implored humans to stop wasting their waste.
Hardly anyone today, no matter how green-minded, would consider the endeavor my grandfather did so nonchalantly every year. But for those who want to return their dues back to nature, there are easier ways to do so, says Kelsey McWilliams, who started her circular sanitation consulting company Point of Shift after working for the Toilet Board Coalition, an organization that facilitates sanitation solutions worldwide. Composting toilets in America are a rare phenomenon, but that’s changing. According to the composting toilets map that McWilliams maintains, there over 100 of them in the US. McWilliams's typical clients usually reside in rural or suburban areas and are looking to convert their waste into nutrients to build more resilient soils. “A lot of eco-villages and off-the-grid communities want nicer alternatives than outhouses and Porta Potties,” says McWilliams. She is also starting to work with a public restroom company that installs toilets in state parks to design more sustainable alternatives.
While small urban backyards may not be ideal for making “humanure,” eco-minded folk in country settings can set up a composting toilet with minimal investment. The technology is relatively simple, but it does require following a few rules. Here’s McWilliams’s step-by-step guide to building and operating a low-cost, compost-popping loo.
1. Check your state and county regulations
When it comes to sewage and composting, each state has its own regulations. Before you start, Google your state and county building, plumbing, and septic codes and composting rules. The regulations will tell you whether you need to fill out an application or any other paperwork. The good news is that if your home is already connected to a municipal sewer or a septic system—and most American homes are—getting your application or permit approved is usually straightforward. “Most of the time, the regulators just want to make sure you have a backup plan if your compost toilet doesn’t work,” McWilliams says. So as long as you have a still-functioning porcelain throne, you’ll likely get a greenlight for your composting one. Another way to research it is to find the existing compost toilets in your area—and there’s a map to find them.
2. Build a welcoming abode
If you’ve never experimented with a composting toilet before, the easiest setup is to use a 55-gallon barrel or a large trash can as a receptacle for the fertile muck. That requires building a raised structure with a back or side opening, through which the barrel can be wheeled in and out. McWilliams suggests investing some time and effort in your domicile design to make it welcoming and appealing. For example, a cute chalet that harmoniously blends with surrounding trees goes a long way. Interior decor is important too—potted flowers, dry bouquets, or fragrant wood help make it cozy. Inside the structure, build a bench or a seat with a round opening, underneath which the barrel will go. Fit a comfy toilet seat with a lid onto it. “We recommend designing the toilet as your refuge,” McWilliams says. “We are developing a line of bright colors and uniquely shaped toilet lids and seats.” For cold climates, space heaters can help keep the toilet space warm, although in really frigid winters, you may have to take a toilet break from your regular waste depositing.
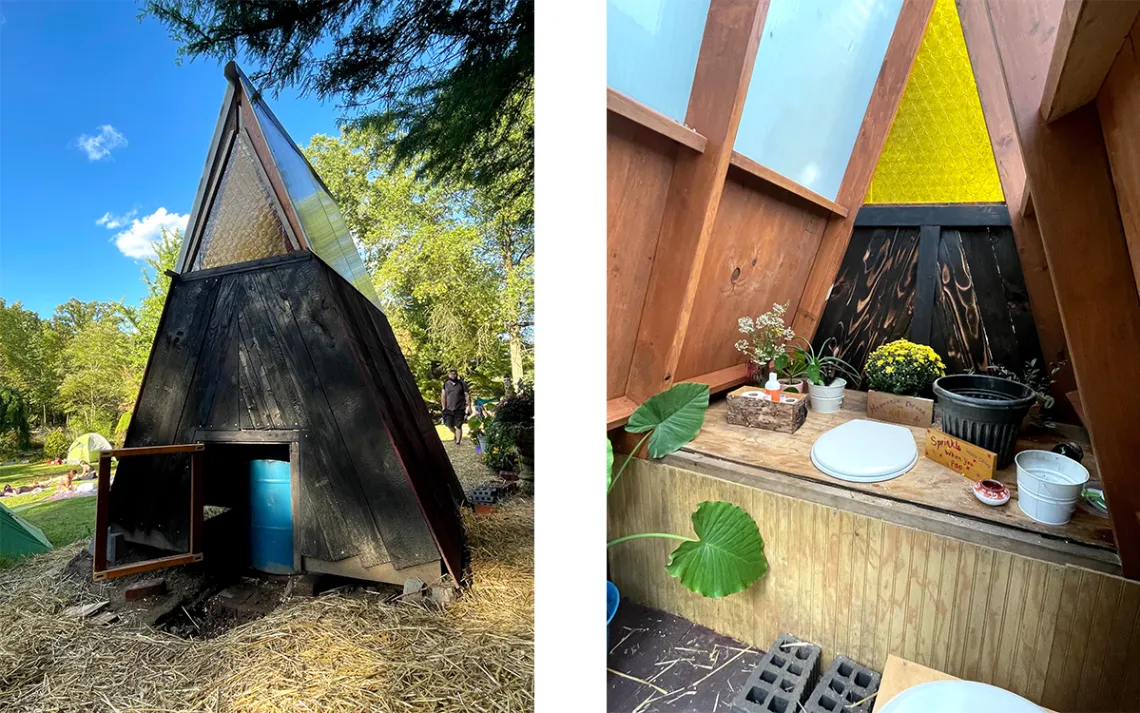
Photos courtesy Kelsey McWilliams
3. "Flush” with sawdust, leaves, and dirt
Once the structure is finished, place the barrel directly under the toilet seat. Using a wheeled barrel is best. Maneuvering an empty barrel is easy, but pulling a full one out can be challenging, so wheels carry you a long way. Next to the seat, place a bucket of dry organic matter such as sawdust, dry leaves, cut grass, and even just dirt, which you will use instead of flushing. Gather whatever your environment offers, says McWilliams, rather than buying peat moss or other substances harvested far away and transported with the use of fossil fuels—that just defeats the purpose of your sustainability effort. Add a layer of hay, dirt, and leaves at the bottom of the barrel to soak up the initial liquid. Voila, your toilet is ready for use!
4. Use toilet paper and coffee grinds
Every time you give your dues back to Mother Nature, toss in enough organics to cover the poo and soak up the pee. That cuts the odors and starts the decomposing process. Toilet paper biodegrades perfectly, so feel free to pamper yourself. “People are worried about toilet paper, but as long as you don’t have a huge amount of it, it’s totally fine to compost,” McWilliam says. In fact, it helps absorb the liquid, which is important for proper composting. People also worry about odors, she adds, but if you use enough organic matter, composting toilets don’t smell bad, especially compared with the chemical-smelling Porta Potties and stinky outhouses.
“And if you are concerned about smells, toss your spent coffee grinds down the barrel periodically,” she says. “Not only is it really good for the composting process, but it also eliminates odors.” You can also toss in plants and leaves, and some finished compost too. What not to throw in? Baby wipes, diapers, and anything that has plastic in it is a no, McWilliams says. It’s also best to avoid menstrual products because they take a long time to decompose.
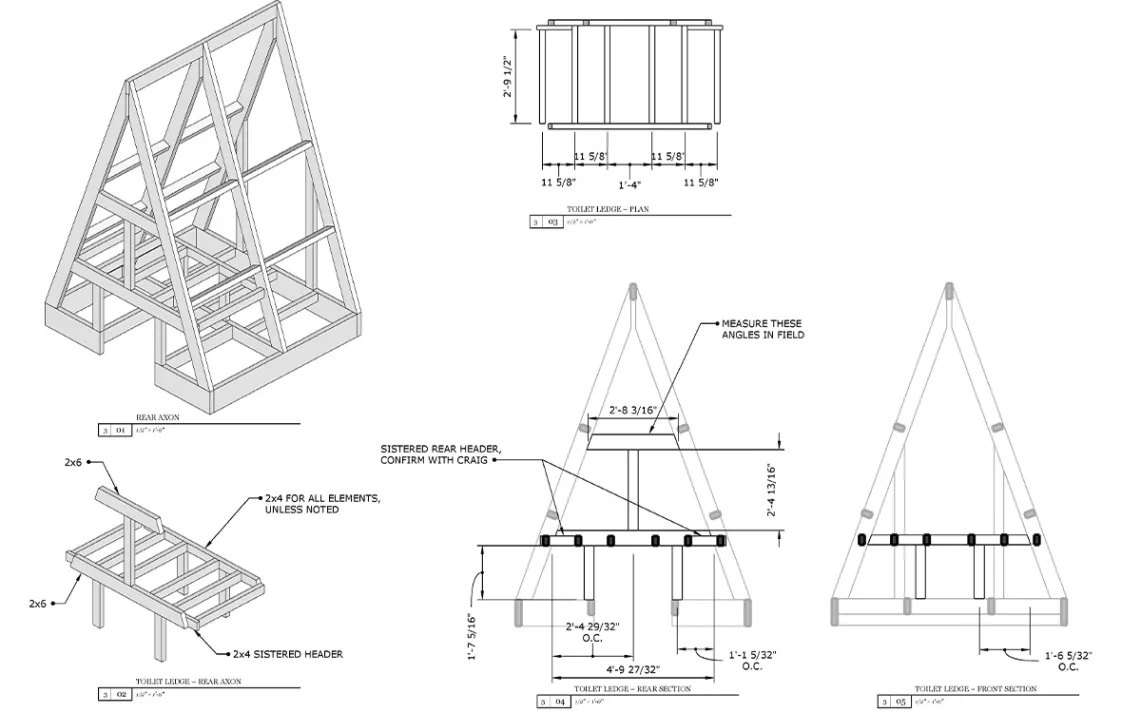
Drawings courtesy Nicky Rhodes
5. Check the barrel as it starts to fill up
On average, a 55-gallon barrel could sustain a family of five for about six to eight months, McWilliams says. An industrial-size trash can of 60 or 96 gallons would last longer, but they are heavier and bulkier to maneuver, she cautions. Exactly how fast they fill up depends on several factors, such as how many people use the toilet and how often. It also depends on how much people drink and how much urine they produce. More urine requires more sawdust or dry leaves to soak it up, which will fill up the barrel faster.
It also depends on the weather and humidity. In arid climates like Arizona or Nevada, a lot of liquid will naturally evaporate, so you will need much less absorbing biomass. But in the humid northeast weathers, all that pee will need loads of organic material. It’s important to avoid the barrel’s content being too liquid because it won’t decompose correctly, McWilliams cautions. Inside the barrel, proper compost-in-the-making should look solid rather than sludgy. “A sloshy sludge won't really compost on its own.” How do you know you’ve got the right composition “cooking” down there in the barrel? “The viscosity should be like wet dirt, the kind of dirt a couple of hours after a rainfall,” McWilliam says. Not sure you got the right composition? “Definitely err on the side of adding more organic matter.”
6. Don’t let your barrel fill up completely
Not only is it hard and not-so-pleasant to maneuver a full barrel, but you won’t be able to execute the important finishing composting accord. Once the barrel is 75 percent full, wheel it out while wearing a mask and gloves, and add at least one inch of compost or dirt from your backyard. That will cut the smells but also supply the much-needed soil microbes that chew through your deposits, converting everything to rich, fertile muck. If your backyard naturally has worms, dig some up and add them to the mix. “Worms are great because they'll eat the waste and they also aerate the compost pile by creating little tunnels, letting more air get through,” McWilliams says. “But if worms aren't natural to your backyard, skip them,” she adds—because it’s best to mimic your natural environment.
When covered, the barrel should let in some air but keep 90 percent of the rainwater out. To achieve this, drill holes on the sides of the barrel near the lid and then cover them with mesh to allow for air to flow in and out of the barrels. The mesh prevents flies and other insects from getting in. Store outside for at least one year or longer—18 months. When you open it again, out will come a heap of rich, fluffy humus, ready to feed your plants, trees, and bushes. It shouldn’t be used on vegetable gardens, McWilliams cautions. Moreover, it shouldn’t be applied "upstream" from vegetable gardens to avoid that water flowing downhill. Ten to 20 feet is a good minimum distance, she says.
Further Toilet Reading: The Humanure Handbook: Shit in a Nutshell by Joseph Jenkins.