Congratulations, your AddUp campaign is live! Now that it's live and public, a successful AddUp campaign is achieved by you doing the following:
- Promote your new AddUp campaign over email, social media, etc. (covered in the "Promoting your Campaign" section below)
- AddUp’s flexibility allows updates to your campaign as your needs and goals change (covered in the "Changing Actions" section below). Mix and match individual actions to suit your campaign as you reach milestones and benchmarks. While not every AddUp campaign needs multiple actions over time, sustained engagement on the same AddUp campaign over time increases the likelihood of a win.
- Communicating with your AddUp supporters about news and new actions through the Campaign Update feature, anytime, as often as needed. Download supporter lists for 1:1 follow-up with supporters or delivery to decision-makers with the click of a button (covered in the "Communicating with your supporters" section below).
- Repeating the three steps above until you achieve your ultimate goal!
Now that your AddUp campaign is live...
To create as much visibility as possible for your AddUp campaign, you'll need to manually promote it yourself. Whether that's by sharing links to your AddUp campaign to an email list you’re already a part of, sharing it to a Facebook group, or to any of your other personal social media channels, you’ll want to share your new link far and wide!
There are instructions for all kinds of ways to promote your AddUp campaign under the "Promoting your campaign" header below. There you'll find instructions for promoting your campaign over email, social media, and websites. For Sierra Club Salesforce users, there's also instructions here for building Salesforce Promotions that link to AddUp campaigns, and for inserting those links in Marketing Cloud emails.
Once your campaign is live, it'll have its own dashboard, where you have access to:
- Links to edit your campaign, view it live on AddUp, views its status (Live/Closed/etc.), End your campaign or Re-launch it.
- The ability to add campaign collaborators, which you can find by going to the "Campaign Managers" tab and then clicking "Add Collaborators." Collaborators must have an AddUp campaign management account, which they can gain by filling out this form.
- The Campaign Update tool (accessed by clicking Post New Update) to keep your supporters abreast of breaking news about your issue, campaign victories and milestones (even small ones), and share new actions they can take. You can opt to have these updates automatically emailed to all of your campaign's supporters, but you can also turn this particular feature off. More on how to create a Campaign Update here.
- Promotional Tools which provide you links to share your campaign on Twitter, Facebook, copy a simple URL for sharing elsewhere, or embed a widget that will link to your AddUp campaign from another website (a Chapter website, for example).
- Downloads which allow you do download several different detailed lists of your campaign's supporters in a .CSV spreadsheet format, with the ability to download data on all the actions that have been taken on your campaign, just those who've signed your Petition (Advocacy action) or sent a message through your Contact Officials form, just those who've RSVP'ed to your events, or just those who've signed up to Volunteer.
To access your campaign's dashboard,
- Go to the AddUp Campaign Management homepage (which is also accessible by logging in at AddUp.org and selecting "My Campaigns/Events" from the dropdown menu in the upper navigation bar).
- Navigate to "Campaigns" in the navigation bar, then "Manage Campaigns" from the dropdown menu.
- You'll now see a list of all your AddUp campaigns. Live and closed AddUp campaigns will have a dashboard. Draft campaigns will not. For whichever campaign's dashboard you wish to access, mouse over to the campaign title, or its dashboard link, and click on it. You'll be redirected to the campaign's dashboard from there, which should look like this:
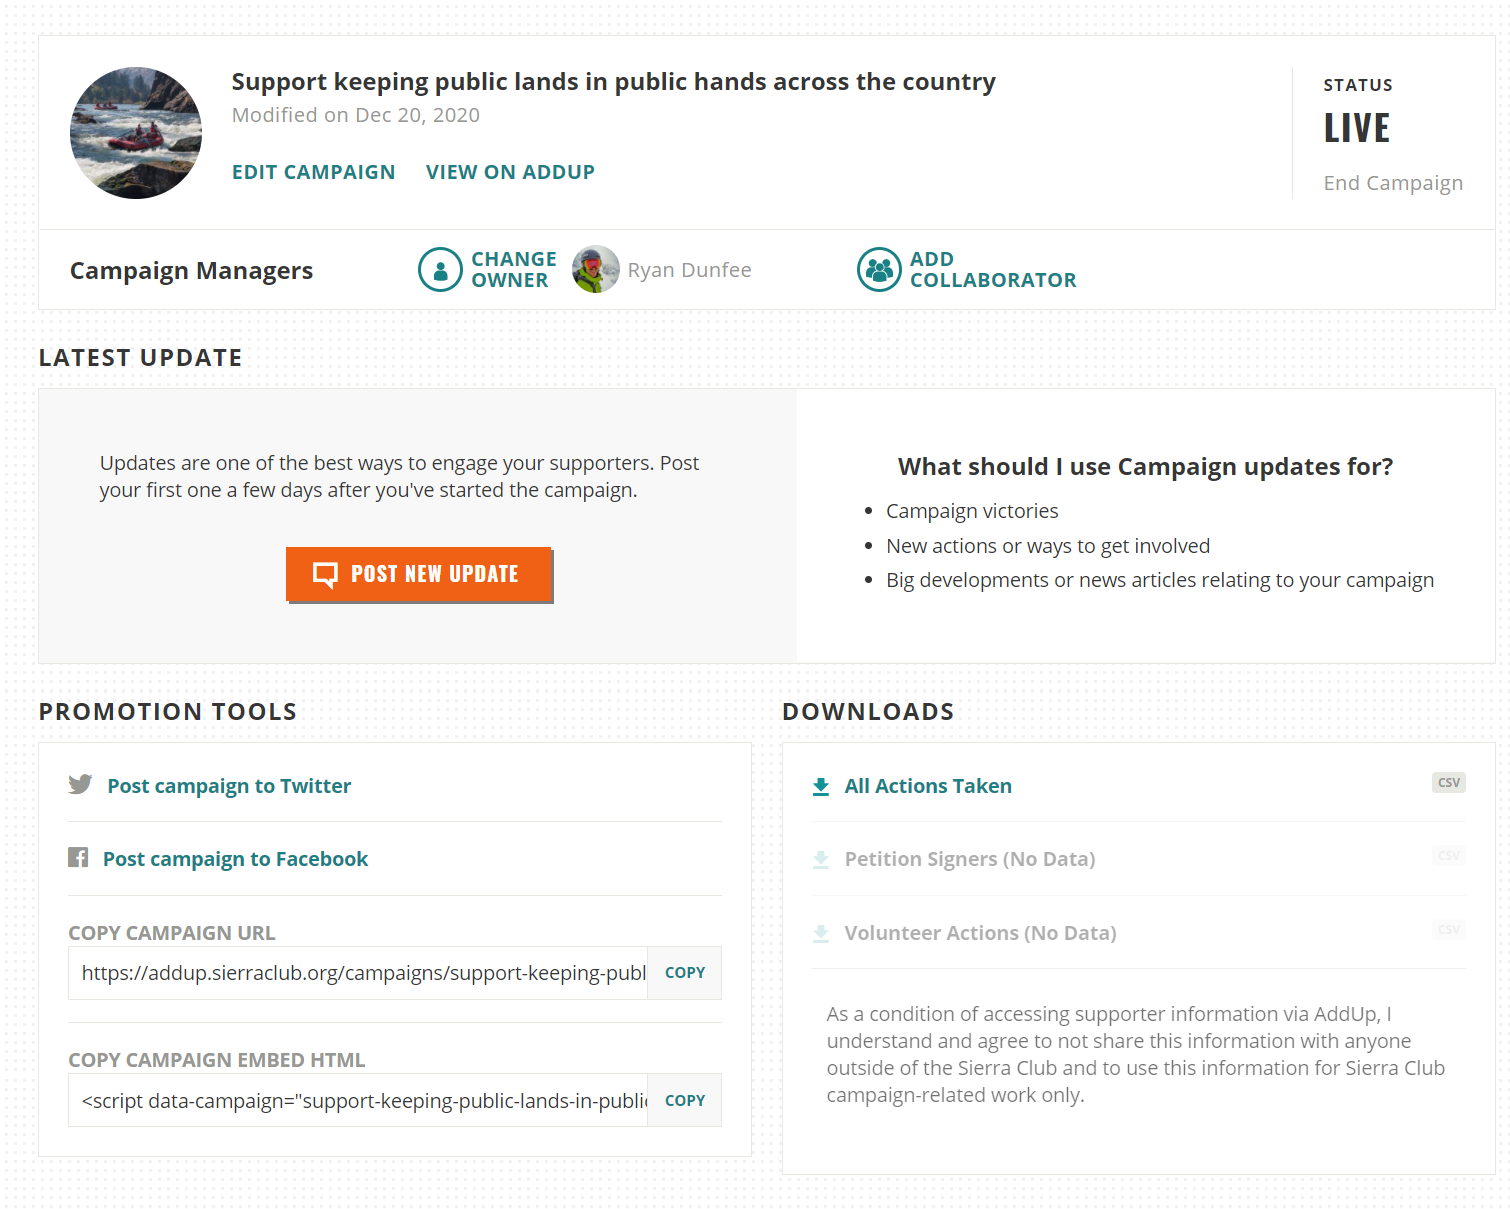
- At the top, you can reassign ownership of the campaign to someone else ("Change owner"), edit the details of the campaign, view what it's looking like now for the public on AdUp, and end or relaunch your campaign.
- On the "Campaign Managers" line, you can click "Change Owners" to switch the chief ownership of the campaign from you to someone else. You can click "Add Collaborator" to add one or several collaborators to your AddUp campaign (again, they just need an AddUp campaign management account). Collaborators can edit a shared campaign, see stats for the campaign, post Campaign Updates, and download spreadsheets with campaign supporters. Only campaign owners can publish, close, or republish a campaign, change the owner or add/remove collaborators, or delete their campaign.
- Under "Latest Update," you can click "Post New Update" to start a new Campaign Update that'll be automatically emailed to all your existing AddUp supporters. For more guidance on how to create a campaign update, navigate to the "How to send a campaign update to your AddUp supporters" section on this page below "Communicating with supporters."
- Under "Promotion Tools," you can post a link to your campaign on your Twitter or Facebook account, copy a simple link to your campaign, or copy HTML code to embed a stylized link to your campaign on a website. You can also go here to access an AddUp widget that will allow to link all your AddUp campaigns on one page.
- Under "Downloads" (which will remain grayed out and inaccessible until you have actual supporters who've taken action on your AddUp campaign), you'll be able to download various lists of supporters depending on which action they took, or of all supporters. You'll receive an email with a link to a spreadsheet that will then download to your computer. For more information about formatting lists of supporters for delivery to decisionmakers, scroll down on this page to "How do I deliver petition signatures to a decision maker?" under the "Communicating with supporters" section.
AddUp allows you to add campaign collaborators, who can help post Campaign Updates, make ongoing edits to the campaign, and access information about the campaign and its supporters. To add collaborators, publish your campaign live (collaborators can't be added to a draft campaign), go to the "Campaign Managers" tab and then click "Add Collaborator."
Collaborators must have an AddUp campaign management account, which they can gain by filling out this form. Collaborators can edit a shared campaign, see stats for the campaign, post Campaign Updates, and download spreadsheets with campaign supporters. Only campaign owners can publish, close, or republish a campaign, change the owner or add/remove collaborators, or delete their campaign.
As it stands, when someone who has never interacted with Sierra Club before takes their first action on AddUp, there are added to a default set of email lists:
- They will receive an initial welcome email from Sierra Club
- They will receive periodic communications from the organizer of any AddUp campaigns they take action on, along with recommendations for new AddUp campaigns they might be interested in
- The national Actions list, which sends regular emails about action taking opportunities
- The national Fundraising list, which periodically reaches out to solicit donations to the organization
- The Insider, Sierra Club's main newsletter, sent every Tuesday, which shares news, stories, and information about active campaigns
- The Climate Parents list, which periodically communicates with folks about opportunities to take climate action as a parent, or as a student
- The Political list, which communicates with folks about opportunities to support Sierra Club-endorsed candidates, particularly during major elections and mid-term elections.
- If they take an action that requires a zip code, they will get added to their state's Sierra Club Chapter list, which communicates periodically with folks about news, stories, and campaigns within their state.
- If they take an action that requires a phone number, the will get added to our mobile communications list, which will text people periodically with information related to the lists above
As an organization, we are working on a long-term program to provide a more intentional welcome journey so people new to Sierra Club receive communications that are more tailored to where and why they joined. But, given that for now new action takers are automatically added to the lists above, if you're working with folks for whom receiving a donation solicitation from Sierra Club would be inappropriate, it may not be wise to ask them to take action on AddUp (or other Sierra Club websites). For more information or guidance, please email AddUp@SierraClub.org.
However, anyone can control what emails they receive from Sierra Club by clicking the "To unsubscribe from AddUp emails, click here" link that is in the footer of every single email from AddUp (other Sierra Club emails will have a similar footer):

From here, they can click the red "Unsubscribe" button to unsubscribe from AddUp emails, or they can control all their Sierra Club email subscriptions by scrolling down to the "Manage preferences" button under "Other Options:"

Promoting Your Campaign
You need to promote your AddUp campaign to your network -- maybe that’s Sierra Club members and supporters, your own email list, a Facebook group, a Twitter account, etc. We’ve made it easy for you to promote your campaign - everything you need is in one place on your dashboard.
If you are a Salesforce user, you can learn how to promote your AddUp campaign with a Salesforce Promotion that is then used as a link in a Marketing Cloud email on the AddUp for Sierra Club Saleforce users page.
-
From the AddUp campaign management homepage, navigate to “Campaigns” in the top navigation bar. Then click “Manage Campaigns” in the dropdown menu.
-
From the “My Campaigns” list, click on the campaign name or “Dashboard” button on the campaign you want to promote.
-
In the bottom lefthand corner, you’ll notice “Promotion Tools.” These include links to share your AddUp campaign as a post on your personal Twitter or Facebook page, as well as “Copy Campaign URL,” which will provide you with a link to your campaign you can use for social media posts, emails, etc! You can get the same link by clicking “View on AddUp” from the Campaign Dashboard and copying the URL. It should read something like https://addup.sierraclub.org/campaigns/your-campaign-title.
“Copy campaign embed HTML” allows you to copy HTML code you can use to display a more visually striking widget linking to your AddUp campaign on a website. To add multiple campaigns to your website, scroll down to “How can I embed links to myAddUp campaign(s) on a website?”


If you want to slightly increase the likelihood of a supporter taking a particular action on your AddUp campaign, user a direct link to that action:
-
From your campaign Dashboard, click “View on AddUp.”
-
When your AddUp campaign is loaded, navigate to the horizontal bar that starts with “Get Started,” and lists the sequence of actions on your campaign (“Take action,” “Donate,” etc.).
-
Click the action you’re wanting to link to. You’ll notice that the screen scrolls down to that particular action. Now you can copy and share that link (which might read something like https://addup.sierraclub.org/campaigns/your-campaign-title/petition) with supporters, who will be directed immediately to that action when they load the page.

If you or a partner are comfortable with basic HTML code, you can use the AddUp widget to embed a stylized link to an individual AddUp campaign, or multiple campaigns, on a website. Many Sierra Club Chapters, for example, are using this widget to embed a list of the Chapter’s AddUp campaigns on their homepage, homepage sidebar, or on a dedicated “Take action now!” page.
Head to the AddUp widget; there you’ll find a number of options to make a custom list of AddUp campaigns to display. You’ll then need to paste the resulting HTML code onto the page in your website content management system where you’d like it to display.
You can use the following process to have event attendees take action (like sign a petition) on your AddUp campaign, or to upload paper signatures you’ve collected one-by-one to your AddUp campaign. AddUp is designed to remember all the actions a campaign supporter has taken, which would normally prevent them from taking the same action twice in a row on the same device. This effectively turns that feature off.
-
Go to your event with your laptop, tablet, or smartphone (if you have one). You'll either need wifi at the location, or enough data to load the internet (good to bring a sheet for paper signatures just in case).
-
Navigate to your AddUp campaign from the AddUp campaigns homepage, or through the Campaign Dashboard in the AddUp campaign management system. Copy the URL to your campaign, which should read like https://addup.sierraclub.org/campaigns/your-campaign-title.
Want to be extra efficient? Navigate to the Advocacy action (or whichever action you want supporters to take) by clicking the blue “Sign” or “Take Action” button towards the top of your campaign (or “Tweet,” “RSVP,” etc. for other actions). That will produce a longer link to the individual action itself, like https://addup.sierraclub.org/campaigns/your-campaign-title/petition

-
Add “?forgetme” to the end of the link, i.e. https://addup.sierraclub.org/campaigns/your-campaign-title/petition?forgetme
-
Now, either copy that link, or save it as an easily-accessible bookmark. Whenever you load the page with ?forgetme in the URL, it’ll forget all about the previous action-takers and let people re-take the action!
If you’re entering signatures from a paper petition or sign-up form, follow the same process and reload the campaign link with ?forgetme at the end to enter a new signature.

How to change or update actions on your live AddUp campaign
AddUp encourages you to add, remove, and modify the individual actions on your campaign over time as the campaign progresses, the context surrounding the campaign changes, and hopefully you reach some of your campaign milestones! The idea is to "recycle" your AddUp campaign as much as possible -- by using the same campaign and simply updating it over time, you'll have a consistent destination for supporters to come back to, and will also be able to easily email all your campaign's supporters with the Campaign Update feature.
In general, you want to reuse your existing AddUp campaign as much as possible. However, if you are running a C3 campaign, and now have C4 actions you want supporters to take, you’ll need to start a new AddUp campaign (and use your campaign update on your old C3 campaign to link folks to the new one). You may also want to start a new campaign if the issue and goals are significantly different with your new action than those of your existing campaigns.
-
Go into your AddUp campaign’s Campaign Dashboard in the campaign management side of AddUp. Go to the Actions tab.
-
Click the “Remove” link at the bottom of the individual action you want removed.

Tweet action: Change directly in AddUp using the same process as creating a Tweet from scratch. Head here then scroll down to "How to add the Tweet action to your campaign."
Events: If you are adding event(s) to your AddUp campaign for the first time, head here then scroll down to "How to add events to your campaign".
If you need to remove an event that's on your AddUp campaign now, open the edit view of your AddUp campaign (accessible from your campaign's Dashboard -- scroll up on this page to "How to access your campaign's Dashboard" if you don't know where to find that), go to the Actions tab, then scroll down to your existing event action. Click the "X" in the righhand corner of any event you want to remove:

If you need to add an additional event to your AddUp campaign, open the edit view of your AddUp campaign (accessible from your campaign's Dashboard -- scroll up on this page to "How to access your campaign's Dashboard" if you don't know where to find that), go to the Actions tab, then scroll down to your existing event action. Click the orange "+Add Another" button below the last existing event on your campaign:

To edit the content of those events, you'll need to edit them where you created them (Salesforce, Campfire Events, or AddUp). If you created an event on Salesforce or Campfire Events, but need to access it on AddUp for any reason, email AddUp@SierraClub.org with a link to the event to request that it be reassigned.
Social media recruiting: You can either add or remove the Recruit action, but there's no further options to customize this action.
Fundraising: You can edit the funds you're raising donations for directly in AddUp using the same process as building your first fundraise action. Head here then scroll down to "How to add fundraising to your AddUp campaign."
Volunteer recruitment: You can adjust the volunteer roles you want folks to sign up for, and the pitch for those roles, directly in the Volunteer action using the same steps used in creating this action from scratch. Head here then scroll down to "how to recruit volunteers on your campaign."
Advocacy action: there are two workflows for changing this depending on whether or not you have Salesforce access. Scroll down to "How do I update my Advocacy action if I do not have Salesforce access?" or "Sierra Club Salesforce Users: How do I modify my Advocacy action?"
-
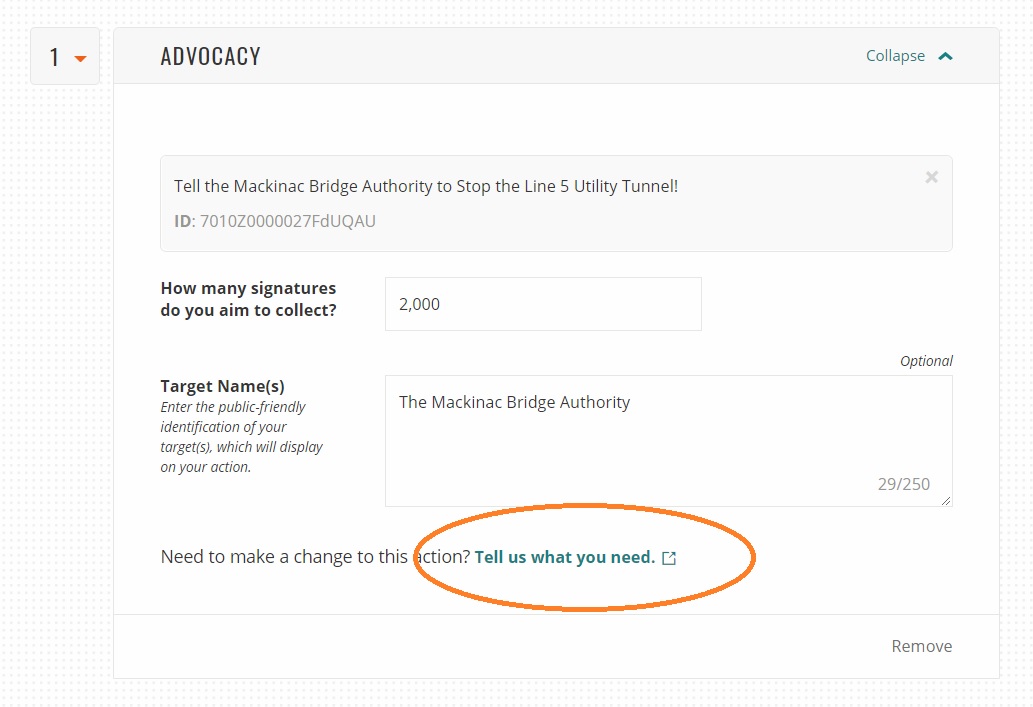
Go to your Advocacy action on your AddUp campaign.
-
At the bottom of the Advocacy action, click "Need to make a change to this action? Tell us what you need."
-
A new window will open in your email client/program. This will be set up to email the AddUp team at AddUp@SierraClub.org , and will feature a number of fields beneath Please fill out the requested changes: where you can detail the changes you want made to your Advocacy action ( Target(s) / Headline / Subject / Message/petition text / Other changes).
Once you've detailed the changes you need, the AddUp team will make the requested changes on their end and let you know when the campaign is updated!
-
Go to your existing advocacy form in Salesforce and make the desired changes. Whatever message you have, target set up, etc., is all controlled in Salesforce (not in AddUp). The fields that show up publicly on AddUp in the Advocacy action are the “Action Title,” “Default Subject Line,” and “Default Message” fields. AddUp will also reflect if you’ve enabled personal comments by checking the “Display Personal Message Option” field.
-
Click “Save” on Salesforce. Also make sure “Active” is checked, along with "Include in Public Action List?", and that “Test Mode?” is unchecked.
-
Your changes should appear on AddUp in 10 minutes or less.
-
Make sure your new advocacy form in Salesforce has the “Active” box checked, along with "Display in public action list?" and that the “Test Mode?” box unchecked. 10 minutes after doing so, your advocacy form should be searchable on AddUp.
-
Go to the Actions tab of your AddUp campaign. Scroll down to the Advocacy action.
-
Click the "X" next to the existing Advocacy action to remove it.
-
Search for your new advocacy form using either the Action Title (ex. “Stop Radioactive Taxpayer Giveaways”) or its CORE Campaign ID (“7013q000001axbwAAA”) from Salesforce.
-
Click the desired advocacy form to add it to your AddUp campaign.
-
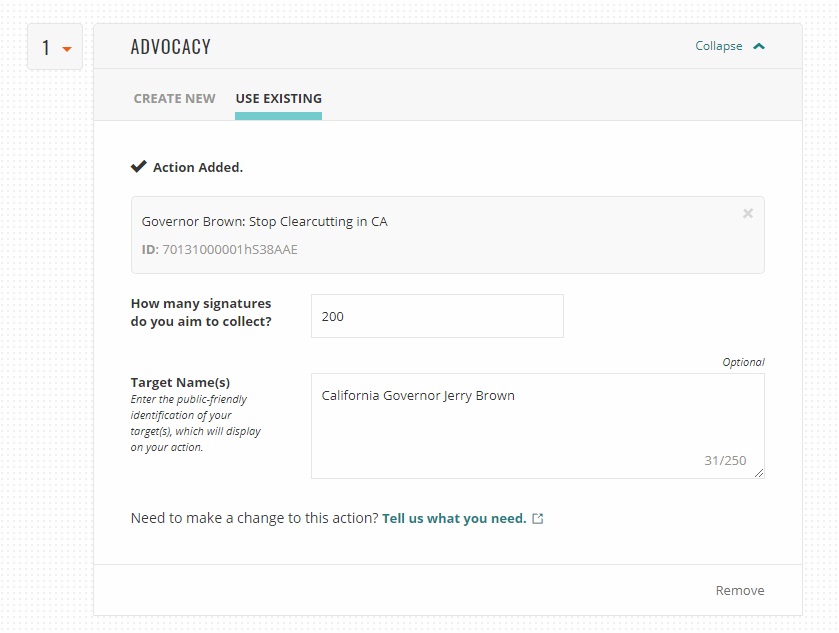
How many signatures do you aim to collect? This is an individual goal for this individual action (not your goal for overall supporters). Start small and beat it!
-
Target name(s): This is what your supporters will see in the “TO:...” field when considering your advocacy action (ex. “Your Ohio state senator” or “Satellite Beach city leaders”). It does NOT control who the email message is actually sent to (if you are using a Contact Officials action). That is controlled in Salesforce when you set up your advocacy form!

-
You’re done! Click “Publish Changes” at the top.
How to communicate with your AddUp supporters
The Campaign Update feature, which is accessible from the Campaign Dashboard under “Post New Update” on any of your AddUp campaigns, is a blog-style tool that can be used to keep supporters in the loop about new actions to take, campaign goals that have been achieved, news about your campaign issue, or anything else you think your supporters would be interested in hearing about.
When you publish one, you have the option of having the update automatically emailed to all of your AddUp campaign's supporters (That is, those who've taken action on AddUp, as opposed to on Salesforce, or through manual petition signing offline). So it's best to promote your AddUp campaign whenever possible in order to get the biggest benefit from this feature!
These Campaign Update emails get really high engagement (like 40-50% average open rate!!) and avoid you having to build an email in Marketing Cloud, so they are a really efficient way to follow up with your supporters and encourage them to take follow up action, like RSVP to an event you just posted on the campaign, or about a campaign victory!

Once published, a Campaign Update sits at the top of your AddUp campaign between the Why This Campaign Matters section and your first action.
-
Once you've gotten a decent number of supporters on your AddUp campaign (you can see how many by looking under the Supporters header in the Your Campaigns view), go to your Campaign Dashboard and click “Post New Update.” A new pop-up window will appear in which you will start entering the details of the update.
-
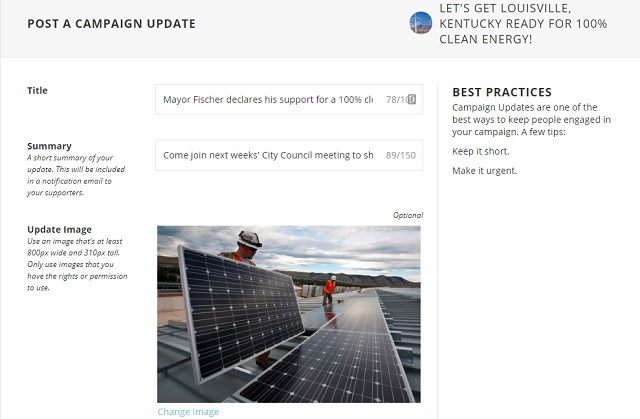
Title: This is the title of your update, and should reflect the news you're sharing, ex. "Mayor Fischer declares his support for a 100% clean energy goal for Louisville".
-
Summary: This is the subtext to your title. Since it will appear in quotes in the body of the email sent out, it'd be good to highlight any actions you're hoping supporters take given the news (i.e. "Come to next week's City Council meeting to push City Council towards a binding clean energy resolution!")
-
Update Image: Not required, but always appreciated. Needs to be at least 800 pixels wide and 310 tall (a horizontal image), and one you have the rights to use (please give proper photo credit in the body of the update -- find info how to find images and credit them appropriately here [link to Campaign Image guidance]). This will sit on the left side of the update with your text wrapping around it.
-
Video: Also optional, you can paste the URL from any Youtube or Vimeo video here and it will embed the video at the top of the update. Preferable to post either an image or a video, but not both.
-
Update details: this is where you write the actual update. There is an toolbar at the top with options of:
B (for bolded text)
I (for italicized text)
U (for underlined text)
L (for hyperlinking text). This is how you'll want to link to news articles, new actions to take, etc.
It's best to do two small paragraphs (unless you have more to share), with the news and link to the news source highlighted in the first paragraph, and the follow-up action you want people to take in the second paragraph.
If you’re linking supporters to an action on your AddUp campaign, navigate to the horizontal bar that starts with “Get Started,” and lists the sequence of actions on your campaign (“Take action,” “Donate,” etc.). Click the action you’re wanting to link to. You’ll notice that the screen scrolls down to that particular action. Now you can copy that link (which might read something like https://addup.sierraclub.org/campaigns/your-campaign-title/petition) and use the “L” button to hyperlink your call to action text (“Take action by signing our new petition!”). Your supporters will be redirected immediately to that action when they click the link.
Be sure to thank your supporters for helping out as well!Comfortable with HTML? The “Update Details” section will accept any HTML code you past into it. So if you want to embed a Facebook video, or multiple videos, or a map, etc., you can simply paste that HTML code into the “Update Details” section (make sure individual elements are no wider than 800 pixels) and you can test how it looks in the preview section.
-
More info URL: While you can also paste a URL you want supporters to go to here, we STRONGLY discourage it since it pastes out a "naked" URL (i.e. the full text of the link) that is ugly. We prefer you use the L button about the Update Details to link text.
-
Send email to supporters: Automatically set to Yes, this is where you control whether the update will trigger an email to all your campaign's supporters. If in the extremely rare case you've sent out more than one in the past couple days, and this isn't as critical an update, please turn this to No to avoid email burnout from your supporters.
-
Click Preview and Publish. This will open a new view in which you can view a preview of what your Campaign Update will look like on the campaign page (under the “On AddUp.org” tab) and what the automatic email sent out to supporters will look like (under the “Email to Supporters” tab).
If you need to make any edits, click the “Edit” button (to the left of “Publish”) and you'll be sent back to the Campaign Update edit view.
-
If all looks good, click Publish! An email will be sent out automatically to your supporters that will link back to the update itself, which is now sitting at the top of your campaign page.
As you publish future Campaign Updates, only the most recent one will be featured on your campaign page (in order to keep the space taken up to a minimum). If you've had one up for several weeks that is no longer relevant, you can always clear it off your campaign page by clicking “Delete” at the top of the existing update in the Campaign Dashboard.


AddUp allows you to download spreadsheets with information about your supporters. This is great for getting to know your supporters (are they disproportionately from a particular town?), reading personal messages they might have written when taking your Advocacy action (Great for ID’ing people for follow up to speak at a public hearing, write an op-ed, or become a campaign volunteer), for doing 1:1 follow-up, and to deliver those signatures to a decision maker (guidance on how to deliver signatures to a decision maker comes after this section).
The specific downloadable lists are:
- All Actions Taken: data about any and all supporters of your AddUp campaign and which actions they have have
- Petition Signers: data about just those who've signed your Advocacy Action(s), including any personal messages they've written
- Volunteer Actions: data just about those who've asked to become volunteers with your campaign through the Volunteer action
Sierra Club Salesforce users can still use these same downloads within AddUp, but can also do quite a bit more extensive reporting on supporters in Salesforce, possibly combining multiple AddUp campaigns to see who took action on similar issues. If you'd like to learn more about reporting in Salesforce, reach out to AddUp@SierraClub.org.
-
From your Campaign Dashboard, locate the Downloads section in the lower right hand corner. Check the disclaimer box -- which certifies that you agree to respect the wish of supporters who've asked not to be contacted by phone or email, which is detailed in the lists you'll download -- and then the ability to download a variety of lists of campaign supporters will become available.
-
You can download the list of supporters based on All Actions Taken, Petition Signers, event RSVPs, or Volunteer Actions.
-
AddUp will send you an email with a link to the spreadsheet, which will then download to your desktop.
-
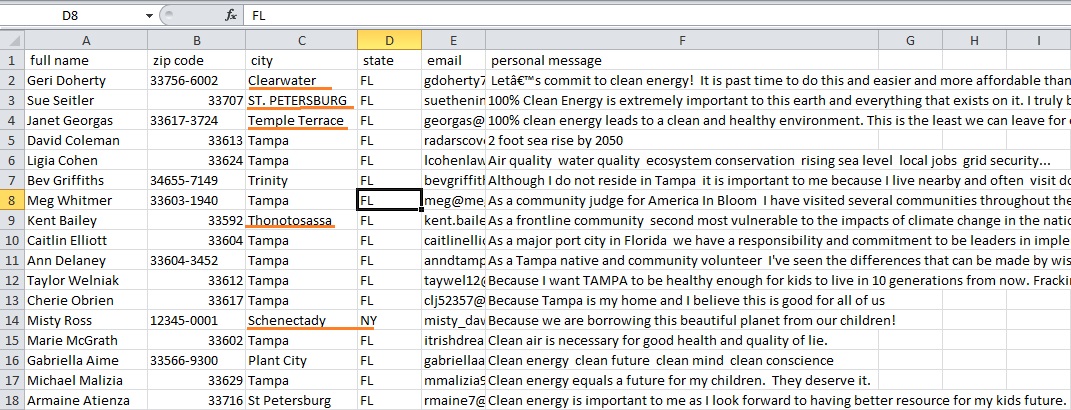
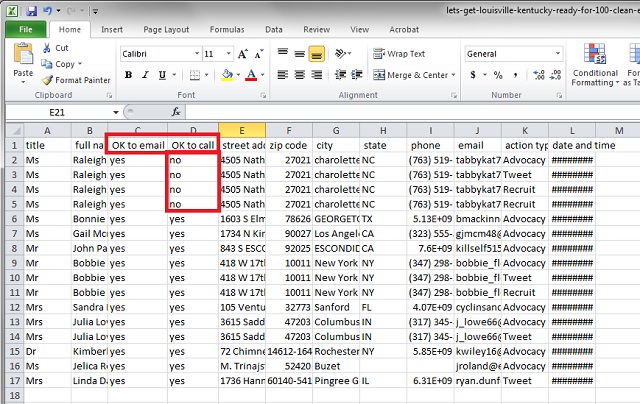
Notice that when you download the spreadsheet of supporters, there are "Ok to email?" and "OK to call?" columns. These indicate whether a supporter has opted not to receive email or phone contact from us. Are you can see below, this supporter has asked not to be called. Absolutely respect these wishes!!

AddUp allows you to download lists of those who’ve signed your Advocacy action in order than you can deliver them to decision makers -- either digitally as an email attachment, or printed onto paper and physically mailed -- to move them to action. The following tutorial will show you how to format your supporters’ signatures on a Word document with a cover letter, which you can either print or send along as a PDF file.
-
Follow the instructions from the last section on how to download supporter information. Make sure to download the “Petition Signatures” spreadsheet.
-
Open the .CSV file. Notice that when you download the spreadsheet of supporters, there are "Ok to email?" and "OK to call?" columns. These indicate whether a supporter has opted not to receive email or phone contact from us. Are you can see below, this supporter has asked not to be called. Absolutely respect these wishes!!
-
Review the “Personal Messages” section in column M. These are the individualized messages (some of your) supporters wrote when submitting their signature to your petition. These are incredible value for your work! You can highlight them to better persuade decisionmakers to make the right decision (since they really value why a particular issue is important to their individual constituents), as well as identify supporters who could give excellent testimony at a public meeting, write a really great op-ed, or even become a volunteer for your campaign!
You can organize your spreadsheet to have them show up at the top in Excel by highlighting all the columns (A-M), then selecting Sort & Filter in the upper righthand corner. In the Sort & Filter box that opens, you can select Column = Personal Messages, Sort On = Values, Order = A to Z, then click Okay.
You can make these personal messages easier to read by selecting column M, then, under "Home" at the top of Excel, clicking “Wrap Text.” This will put all the text within the boundaries of column M (which you'll probably then want to widen), and will make it much easier to read the individual comments. -
Delete columns that you don't need -- especially those you didn’t ask supporters to fill out when taking your Advocacy action. In order to maximize privacy for our supporters -- unless decisionmakers require it -- we tend to delete all the columns outside of Full Name, Zip Code, City, State, Email, and Personal Message. These are usually the fields that we ask for supporters' information for in a petition, even though AddUp will pull in additional information since it connects with our main Salesforce database.
-
If you are delivering to local decisionmakers, you may need to delete supporters who aren't from that area. For example, in this example targeting the Tampa, Florida city council, it's likely that we'll need to delete the signatures from outside the city (AddUp cannot limit folks from taking action down to the district level, only the state level), which are highlighted in orange below. You can simply click on each individual column in the spreadsheet to delete it.
-
Download this letterhead template. Modify it to address the decisionmakers, introduce your group and its work, present on the issue, and paste in the petition message that supporters signed onto, and mention how many folks signed on in support. You can reference this example letterhead from a gender equity-focused Sierra Club campaign if you need an example!
-
Download this second template, with which you'll use Mail Merge to upload and format your petition supporters.
-
On this template, click Mailings > Select Recipients > Use Existing List. Then navigate to your spreadsheet of petition signers and select that document.
-
Now, click Preview Results to verify that your supporters' information will show up correctly. If it's displaying correctly, it should look something like what it does below:
-
Next, click Finish & Merge > Edit individual documents. On the new panel that appears, click Merge Records > All, then OK.
-
This will create a new Word document with all your supporters & their information. Copy & paste that information back into the bottom of the letterhead document. Now it's all in one place -- you're almost done!!
-
If using Microsoft Word, it's best to save the final document as a PDF file. This way no one can try and edit it further! In Word, this can be found under File > Save as PDF. An example of a final, ready-to-be-delivered PDF can be found here.
-
Email your decisionmakers with the final PDF, or print it out to present in person. Well done -- you're all wrapped up!