AddUp campaigns allow you to combine multiple actions on a campaign “homepage” that supporters can return to over and over to take new action and learn about your progress. This customizable platform allows organizers to mix and match actions to win their campaigns. Whether you’re looking to recruit supporters to join your events, to sign petitions and pledges, or to Tweet for change, AddUp has tools to support environmental justice and climate action locally and nationally.
Campaign Basics
AddUp campaigns allow you to combine multiple actions on a campaign “homepage” that supporters can return to over and over to take new action and learn about your progress.
They act as a central destination for supporters, the media, and decision makers to go to learn about your goals and efforts, and for your supporters to take action. Campaigns are a perfect way to recruit even more supporters!
At this time, only Sierra Club staff and volunteers can create new campaigns, although we are working on expand access to campaign creation. Anyone can create an event on AddUp! If you'd like to get AddUp campaign management access, please fill out this form and the AddUp team will get back to you.
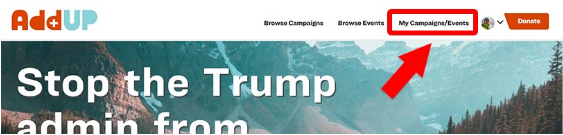
If you are not already logged in, click “Log In” in the top navigation bar.
-
Click “My Campaigns/Events.”
-
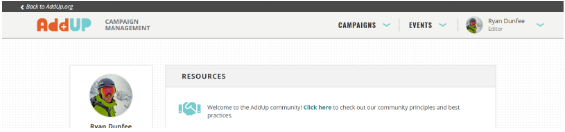
In a new tab, you will be redirected to the AddUp campaign management homepage. This is the “back end” of AddUp where you’ll build and manage your campaigns and events.
If you only see “Events” as an option in the top navigation bar, or don’t have access at all to “My Campaigns/Events,” please email AddUp@SierraClub.org to have your permissions corrected.
Starting a new AddUp campaign
-
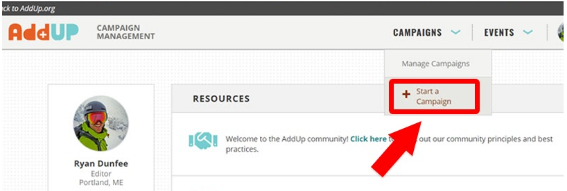
From the AddUp campaign management homepage, click “Campaigns” at the top navigation bar, then “Start a Campaign” from the dropdown menu.
-
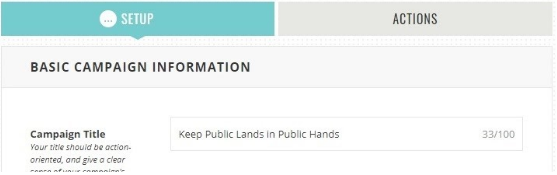
As you see in this new page, there’s two tabs at the top: “Setup” and “Actions.” We’ll start with the Setup tab, where you’ll provide all the contextual information for your supporters.
Ready For 100? Click “Yes” on “Organizing on an existing issue?” and a pre-made Ready For 100 template will population most of the fields of your AddUp campaign! You can edit them all as you see fit, but this should make it quite a bit easier to get going!
- Campaign Title: A concise, goal-oriented title that spells out the broad goal of your campaign. Don’t focus your title on just the first action you want people to take (ex. "Make Michigan A Clean Energy Leader!" vs. "Pass Michigan Clean Energy Bill HS501").
-
Campaign Sponsor: This is where you will call out which entity within the Sierra Club -- National, Chapter, Group, or Grassroots Network Team -- is running this campaign.
Ready For 100 volunteer? Be sure to choose “Ready For 100 Distributed Volunteers” if you’re not working with an existing Sierra Club Chapter or Group.

-
Campaign Image: This is the main image that will represent your campaign on its page (see screenshot below), on social media shares, and as a thumbnail throughout the AddUp site (it’s important!). Images must be horizontal (not vertical or square), at least 800 pixels wide, and it’s preferred they’re photos (versus logos or graphics).
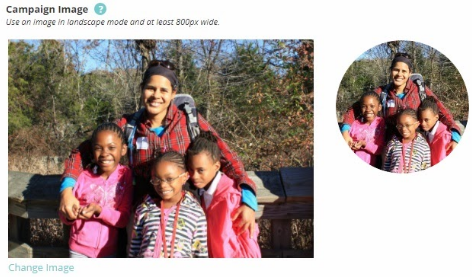
Please make sure this is a photo you have the rights to use, and that you give appropriate credit at the bottom of the “Why This Campaign Matters” section (ex. “Photo credit: Khun Hans (CC BY-NC-ND 2.0)” ). If you need help finding an image, scroll down to the section titled How do I find free, high-quality images for me AddUp campaign? -
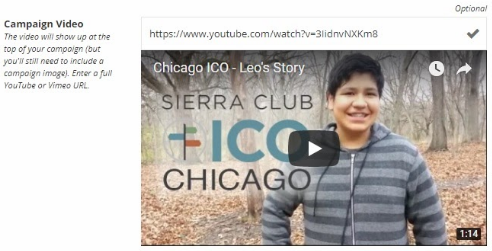
Campaign Video (optional): If you have a compelling (and short - under 3 minutes preferably) video that’s on either Youtube or Vimeo, you can paste the URL from that video. It'll show up on top of the Campaign Image on your campaign page (but you'll still need a Campaign Image as that's what's used for social media and thumbnail purposes).
-
Campaign Summary: This is like the sub-header for your title, providing a little more context for your title. The character limit is 210 characters.
-
Why This Campaign Matters: This is the “meat” (or hearty root vegetable) of your campaign. Why should people care? Why should they take action? This is your chance to draw the potential supporter in, so it’s important to immediately capture their attention with a story about your issue that makes it unique, urgent, and important. 2-3 paragraphs is plenty.
Include a photo credit at the bottom. Referencing the Sierra Club's own Equity Language Guide is a great resource for making sure your campaign content is inclusive!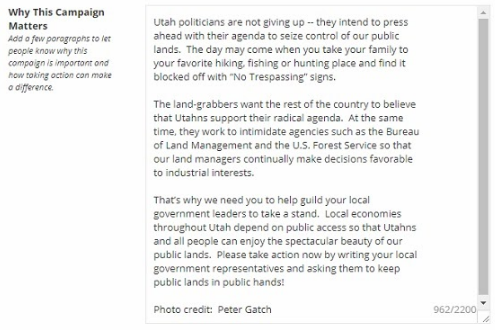
-
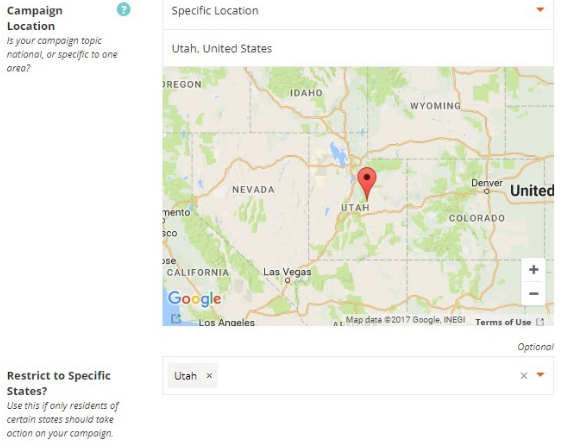
Campaign Location (optional): This make sure your campaign gets recommended to the people who are live in the state where the campaign is taking place. Use this to select whether your campaign is national in scope (default), or specific to a certain area (state, county, city, address, or landmark).
Ready for 100 volunteer? Be sure to pinpoint your campaign to a specific location so that it can show up for nearby supporters on the Ready For 100 map!
-
Restrict to Specific States? If you are working on a regional, state or local action, it's safe to assume your target decision-makers are only going to want to hear from constituents within the area where they have jurisdiction. So if you are doing a regional, state, or local campaign, please call out your state(s) here -- AddUp will hide your campaign from folks looking for campaigns in states outside of your own (unfortunately AddUp cannot restrict visibility beyond the state level).
-
Learn More Link (optional): If you'd like to offer more information to your supporters - say, your Chapter page, or a more detailed page about this specific campaign - insert that URL here. Example: This URL will display on the AddUp campaign as "Learn More: http://www.keeppubliclands.com".

-
Supporter Goal: This is the number of individual supporters you hope to garner for your campaign. A supporter could take one action, or multiple actions, and is why this figure is different from other numeric goals around specific actions. Keep your goal small initially, beat it, and raise it, instead of starting with a very high goal. No idea? Start with something below 500.
-
Campaign Funding Type: Is this a C3 or C4 campaign? 501(c)3 activity is generally focused on “administrative or executive functions,” i.e. agencies (Environmental Protection Agency, Indiana Department of Natural Resources) or mayor, governors, or the President. You can also ask elected officials (city councils, Congress) to enforce existing legislation.
501(c)4 activity is generally focused on passing new legislation via an elected body (city councils, state legislature, Congress) or through a ballot measure.
This will automatically filter the fundraising you're able to do in the Fundraise action. Remember that you can't switch your campaign between the two, so if you anticipate doing C4 work at some point, it’s best to start a C4 campaign if possible. -
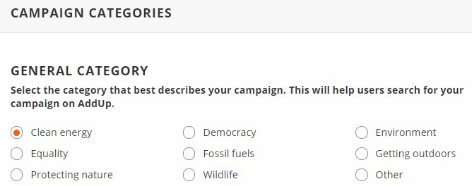
Campaign Categories: Select the one major “Campaign Category” that best matches your campaign topic. This will help categorize your campaign on AddUp, make it easier for supporters to find it, and help inform campaign recommendations to visitors of AddUp and sierraclub.org.
-
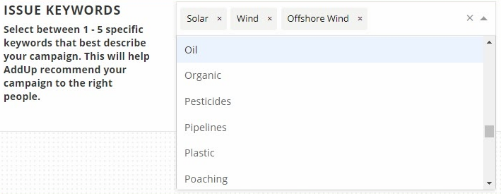
Issue Keywords: You may pick between 1-5 Issue Keywords. You don’t always have to pick five -- if there are only a couple good matches, that’s better than adding additional, poorly matched Issue Keywords. AddUp will use these new Issue Keywords to improve its existing recommendations to visitors, and sierraclub.org will now also use these Keywords to automatically recommend AddUp campaigns based on what AddUp campaign visitors are currently viewing, or what campaigns they have taken action on in the past.
Ready For 100? Make sure to add the “Ready For 100” Issue Keyboard -- this will trigger placement of your campaign on the Ready For 100 map.
-
Click Save at the top. Now you’ve created a Draft campaign (congrats!), which you can leave and will be saved in your campaign dashboard, or you can move on to setting up your campaign's Actions.
Questions? Concerns? Email the AddUp team at addup@sierraclub.org
-
Go to Google.com.
-
Click "Images". Search for your image (‘Wind turbines,” “Salmon,” “Cincinnati,” etc.)
-
Then, on the right hand side, click "Tools." A submenu will appear.
-
Click on "Usage rights."
-
Select "Creative Commons lisences." This will search only photos that are available for public use.

-
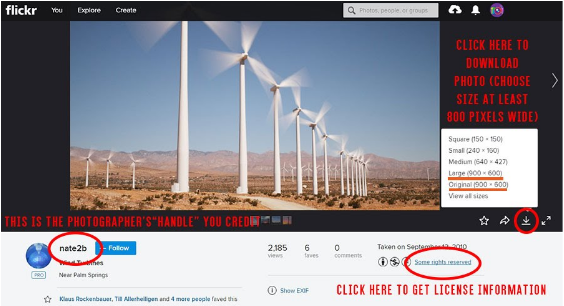
The results will be a mix of Wikipedia, Flickr, etc. DOUBLE CHECK that you actually have the rights to use the photos before using, and label them as instructed below…
-
Find the photographer's name on the page where you found the image (might just be a Flickr username, like "nate2b" in the example here.
-
Find the photo's license by looking for license information on the page -- it'll be in parenthesis and look something like "(CC BY-NC-ND 2.0)." If it's not listed on the photo page (this is the case in Flickr), look for a link that says "license information" or "some rights reserved." This will open a new page where you can find the license info (example here), along with some plain language about what you can do with the photo.
-
Go to the 'Why This Campaign Matters' section of the Setup tab on your AddUp campaign. At the bottom of your text, in its own line, please write in the following format: Photo credit: [name of photographer] (type of license if available), i.e. "Photo credit: nate2b (CC BY-NC-ND 2.0)"
Adding Actions to Your Campaign
When organizers go to build a campaign on AddUp, they’re often starting with the advocacy action (a petition you collect names on, or an email message supporters are asked to send directly to decision makers). This is fairly standard practice, as the advocacy action can be used towards many ends: building a list of supporters early on in a campaign by asking them to sign on to a general pledge or goal, signing a petition you intend to manually deliver later on for a comment period or to decision makers, or enabling supporters send email messages to decisionmakers asking for passage of specific legislation or other actions.
A few things to keep in mind:
-
You don’t have to add anAdvocacy Action, or any specific action on AddUp
-
Your AddUp campaign can host one Advocacy Action at a time, but you can also change it over time -- maybe a change of targets, of message, or switching between a petition and a direct email message (a “Contact Officials” action)
-
Make sure your Campaign Title and campaign context are broader than the goal of this one action (ex. "Make Michigan A Clean Energy Leader!" vs. "Pass Michigan Clean Energy Bill HS501").
You can watch our instructional video or use the written instructions below.
-
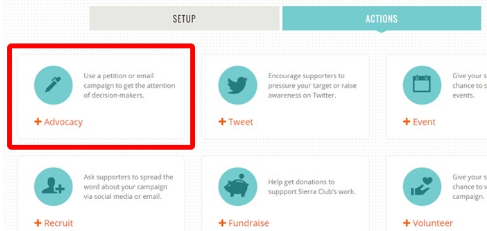
Switch from the “Setup” tab to the “Actions” tab at the top of your AddUp campaign.
-
Click “+Advocacy” to add the Advocacy Action to your campaign.
-
Choose a Petition or Contact Officials Advocacy Action. When the Advocacy Action panel opens, two options will present themselves:
-
Petition, which you can use when you want to collect signatures over time, and then deliver them manually all at once to the target (or to build a list)
-
Contact Officials, which you can use when you want supporters to send individual emails directly to you target(s) in real-time.
-
Who do you want to petition/contact? You can select anyone from the President to your local city council, or even a custom target.
Depending on which you’ve picked (petition or contact officials), you’ll be asked to provide more information about who your targets are more specifically. If you are building a Contact Officials Advocacy Action, you’ll be asked to provide an email address for your target to send messages to (If you have multiple emails to send to, and can’t fit all the target info. in, please send a follow-up email to AddUp@SierraClub.org with the additional information).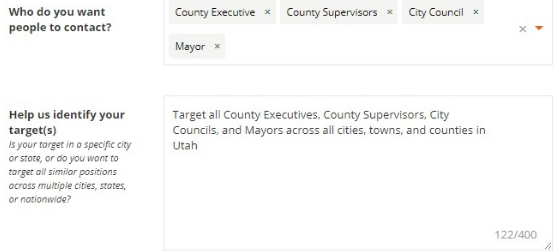
-
Subject/Headline: This is the call for people to take this particular action, and it will appear publicly on your AddUp campaign. If your Campaign Title is "Demand a climate action plan for San Antonio!", then your Headline might be “Send your message to city leaders: San Antonio needs a climate action plan!”
Character limit: 100
-
Subject/Email Subject: If you chose Contact Officials, this is the subject line that your target will receive in their inbox. An example, from the Advocacy action example above, is "Time for Climate Action in San Antonio." For Petition actions, this can just be a title for your petition.
Character limit: 100
-
Petition Text/Email Body: If building a Petition, this will be the message people will be signing onto. If building a Contact Officials form, this will be the message that your target(s) will receive in the email. Make sure you've had a chance to review the Sierra Club's Equity Language Guide to ensure your message is as inclusive and equitable as possible -- thank you!
Character limit: 1600
Note: Our emails do not offer any styling at this time. You are limited to text only.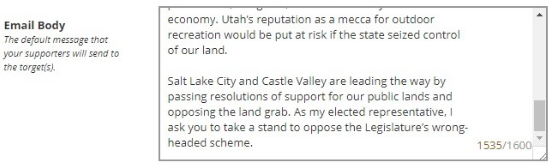
-
Timing: AddUp gives you the option of setting a start and end date for your Petition or Contact Officials form that is separate from the timing of your campaign as a whole. By default, the Advocacy Action will be live as long as your campaign is, but selecting your own dates may be helpful if you want your Advocacy Action to automatically disappear after a deadline (ex. at the end of a public comment period).

-
How many signatures do you aim to collect/how many emails do you aim to have sent? Lastly, set a goal for how many signatures or messages you're hoping to generate for this action on your campaign. Start low -- you can always increase later when you’ve passed your initial goal! This number is separate from your Supporters goal and identifies only the goal you have for signatures on this particular Advocacy Action.
Note: Need help setting a goal? Local and state campaigns normally would ask for 3-500. Regional campaigns 2-5,000. National campaigns 10,000+. Make sure it’s lower than your Supporter goal, though! Beat it and raise it. -
Click Save at the top.
Questions? Concerns? Email the AddUp team at addup@sierraclub.org.
If you have access to Sierra Club's Salesforce, follow these instructions to set up a new advocacy action. If you do not, take a look a the previous question.
-
Build your Salesforce advocacy form. Make sure that...
- "Active" is checked
- "Test Mode" is not checked (without a. and b., it won’t be searchable in AddUp!)
- Your Default Message does not start with “Dear [Decision maker’s name]” and doesn’t end with “Sincerely,” Both these will be inserted automatically when the message is sent to your target (if doing a Contact Officials action)
- Unless you have a compelling reason not to ask for personal messages, check “Display personal message option?” (Did you know AddUp nets you 20-30% more personal messages than Salesforce?)
-
Once you’ve done all this, it should take 10 minutes for the advocacy action to be searchable in AddUp.
-
Switch from the “Setup” tab to the “Actions” tab at the top of your AddUp campaign.
-
Click “+Advocacy” to add the Advocacy Action to your campaign.
-
Search using either the Action Title (ex. “Stop Radioactive Taxpayer Giveaways”) or CORE Campaign ID (“7013q000001axbwAAA”) of your advocacy form in Salesforce. If you cannot find it, reference Step 1; many folks forget to uncheck "Test Mode?" which prevents the form from appearing in AddUp.
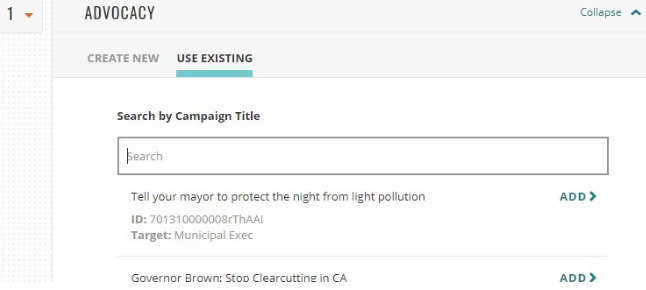
Click the desired advocacy form to add it to your AddUp campaign.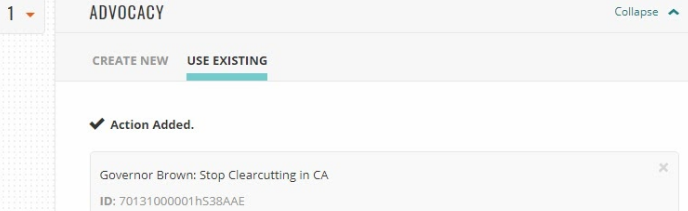
-
How many signatures do you aim to collect? This is an individual goal for this individual action (not your goal for overall supporters). Start small and beat it!

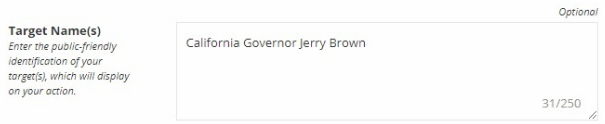
- Target name(s): This is what your supporters will see in the “TO:...” field when considering your advocacy action (ex. “Your Ohio state senator” or “Satelite Beach city leaders”)
-
You’re done! Click Save at the top. Once your campaign is live, remember that you can use AddUp to collect signatures at an event!
Questions? Concerns? Email the AddUp team at addup@sierraclub.org
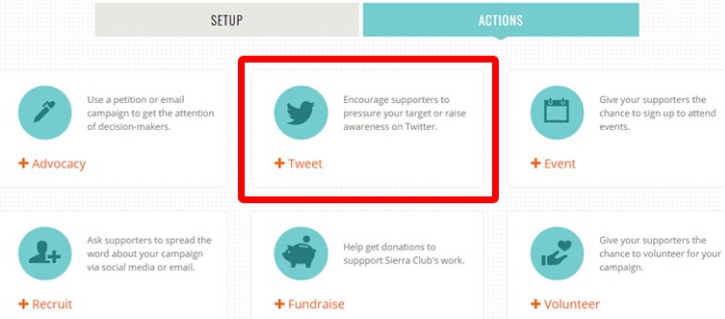
The Tweet action allows you to build a custom Twitter message that your supporters will be asked to share on their own Twitter accounts (they have to have one; you do not). The two standard tactics are to write a message that calls on other folks to come back to the campaign to take action, or to write a message directly to decision makers (if they’re on Twitter). But you can get more creative, too!
To see how to add a tweet action to your campaign, watch this instructional video or use the written instructions.
-
Under the Actions tab, click "+Tweet". The Twitter action setup will open up below.
-
Headline: A short call to action that is different from your Advocacy Action headline or Campaign Title and encourages people to take the Tweet Action in particular. If the purpose of your Tweet action is to share your campaign, try something straightforward like “Spread the word on Twitter” or if it’s to target a decisionmaker, say something like “Tweet up the pressure” or “Add pressure on Twitter”.
Character limit: 140
-
Suggested Tweet Language: This is where you write the default Tweet your supporters will be asked to send. We still have Twitter’s old 140-character limit (it's in our plans to update this) -- so you’ll have to be very succinct. If you are appending (i.e. adding) a campaign link to your Tweet (this step comes next), you need to leave an extra 24 characters to accommodate that link. A link in Twitter, no matter how long or short, takes up 24 characters.

-
Append URL to Tweet? This automatically adds a link to your campaign at the end of your default Tweet. As discussed before, if your goal is sharing, select “On” and if your goal is pressuring a decision maker (e.g. “Hey @POTUS, stop attacking our air!”) you can select “Off.”

-
How many people should take this action? This is your goal just for the number of Tweets you hope to get. A good rule of thumb is making this goal 10-20% of what your Advocacy action goal is (if the Advocacy action is before the Tweet).
-
Tag Elected Official: AddUp now allows you to automatically tag your supporters' elected officials (U.S. Representative, / U.S. Senators / Governor / State Representatives / State Senators) at the start of the default Tweet message! Once you’ve selected an option, AddUp will add the correct official(s) for each supporter based on their location.
Not every elected official, particularly state reps and senators, will have a Twitter handle in the public database (and we can’t control that), and so in those cases, no one will be tagged in the Tweet. It’ll just be the message you wrote. The same is true if we can’t identify a supporter’s location.
So when writing an appropriate message in the Suggested Tweet Language field, it’s best to write a Tweet that’ll make sense whether or not an official gets tagged (ex. “all of our elected officials should be doing more to keep #plastics out of our #oceans. Help pass LD 1490 in Maine’s legislature!”). -
Hashtag: If there’s a hashtag out there that is often used on Twitter when people Tweet about your issue or campaign (#ProtectOurCoast, etc.), add that in here. A feed of recent Tweets using that hashtag will appear on your AddUp campaign.
Adding a hashtag can nearly double the number of folks who end up Tweeting!
Recommendation: To make your hashtags more accessible, use camel case (capitalize the first letter of each word). Twitter reads these the same as all lower hashtags, but folks who have trouble reading will have an easier time distinguishing words. -
Click Save at the top.
Questions? Concerns? Email the AddUp team at addup@sierraclub.org
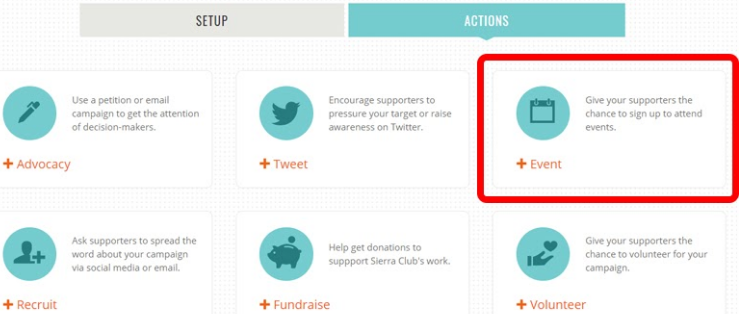
Yes! You can either build an event right within AddUp, and then add it to your AddUp campaign (or promote it independently if not part of a campaign) or add events that already exist on AddUp. Any event built with Salesforce or Campfire are available for any user of AddUp to add to a campaign, too!
Supporters can RSVP for city council meetings, agency hearings, social events, etc. as part of your AddUp campaign by adding an event to it. Giving your supporters opportunities to deepen their engagement by moving from online to offline action takers is huge! You can add up to five events to your AddUp campaign, and AddUp will automatically recommend the event that's geographically closest to each individual visitor (the others will still be visible). You can even add virtual events like webinars and Zoom calls.
- Navigate to the “Actions” tab on your AddUp campaign. Then click the “+Event” box below. The Event Action will appear down below.
- Select from the three options that present:
-
Automatically suggest events to people based on where they live. Will automatically display a few events closest geographically to the individual visitor. Skip to step 7.
-
Show a specific event or series of events to everyone. Choose individual events to show (up to 5) here.
-
Show events attached to a coordinated event. This will open a search panel where you can attach the events of a coordinated event (which organizes events in different places pertaining to a common theme under a single “coordinated event”). The individual events closest to each individual visitor will display on your AddUp campaign

Option A requires no further work. You can skip to step 7. If you chose B or C, continue to the next step.
-
Headline (optional): You can edit the Headline to be more of a call to action (ex. “Attend city council hearings to make an impact!”)
-
Description (optional): Any additional context you want to provide for supporters about the events you’ve selected.
If you chose option C, skip to step 7 from here.
-
Option B (specific events): Find your events. You can search by your event’s title or its CORE Campaign ID (as it’s listed in Salesforce). Click “ADD” to add each additional event you want featured on your AddUp campaign.
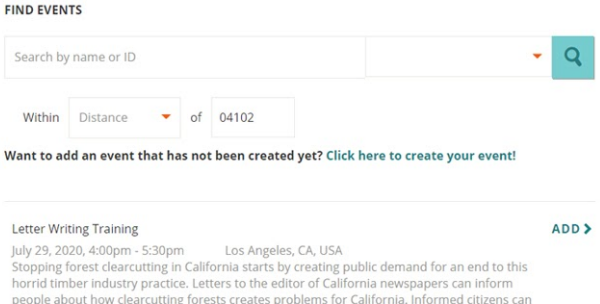
After you’ve selected an event, you can click “+Add Another” to add up to five events in total to your AddUp campaign (the one closest to each individual visitor will show most prominently). -
Also include other nearby events: If you want AddUp to recommend additional nearby events to visitors to your campaign, you can toggle to “Yes” to have AddUp recommend additional nearby events to each visitor.
-
Click Save at the top.
Questions? Concerns? Email the AddUp team at addup@sierraclub.org
The Recruit action invites your supporters to share your campaign on social media via Facebook, Twitter, and email.
-
From the Actions tab of your AddUp campaign, click the “+Recruit” box.

-
You’re done! Click save.
Watch the instructional video below, or the written instructions below that:
-
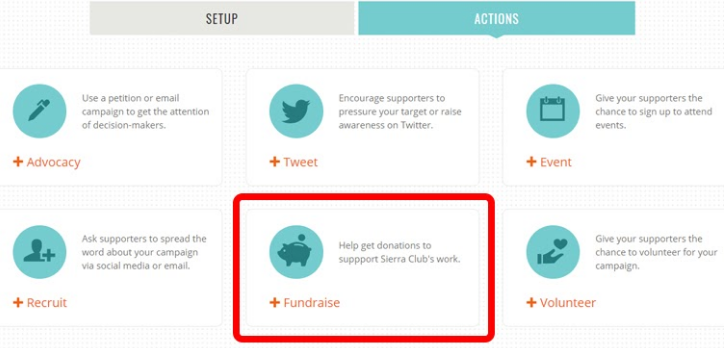
Under the Actions tab, click "+Fundraise". The Fundraise setup module will appear.
-
Why donate? (optional): This is a short description used to convince people why they should make a donation to Sierra Club. You'll need to edit the text to reflect the fund or entity being fundraised for, like "Southwest Water Management Project" within the Utah Chapter list of C3 funds.
Character limit: 300
If you are running a C3 campaign (and thus fundraising for C3 funds), make sure to mention that folks are donating to the "Sierra Club Foundation." Very important to mention the Foundation for boring legal reasons :). C3 money raised on AddUp goes to the Sierra Club Foundation first, and then is disbursed at the end of each month to the Chapter, campaign, etc.
Example: Clean air, clean energy, wildlife, and wild places are under attack in Utah -- and once they’re gone, they’re gone for good. Add your voice to thousands of Sierra Club Utah Chapter supporters committed to defending and preserving these precious resources. Donate to the Sierra Club Foundation today!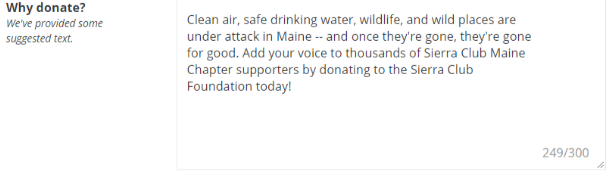
-
Thank You Message (optional): This will display after a supporter submits a donation.
Character limit: 140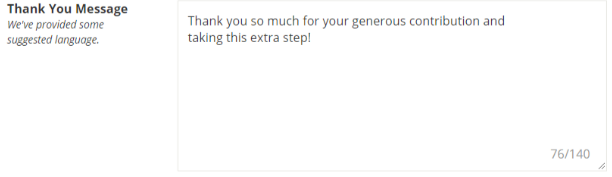
-
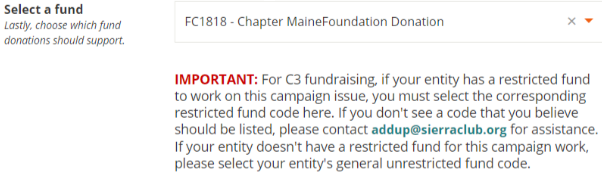
Sierra Club Entity: Select which Club Entity your campaign is associated with (in most cases, this will match the Campaign Sponsor you selected on the Campaign Setup tab), e.g. a Chapter, Group, Grassroots Network, etc. If you’re working with Sierra Club National, select National.

-
Select a fund: At this point, you will see any available funds that you can fundraise for. These are automatically filtered by the Campaign Funding Type you selected on the Setup tab. There may not be any funds if your Chapter or Group does not have one set up.
-
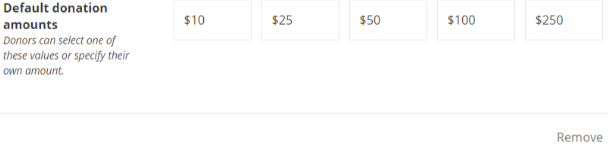
Default donation amounts (optional): You can edit these as you see fit or leave as they are.
-
You’re done! Click save.
Questions? Concerns? Email the AddUp team at addup@sierraclub.org
Watch the instructional video below, or the written instructions below that:
AddUp’s Volunteer action allows you to recruit volunteers directly online to help with your campaign in six different ways. These are day-to-day volunteer roles as opposed to committee roles.
-
Under the Actions tab, click "+Volunteer". The Volunteer action setup module will appear.
-
Headline (optional): You can write your own call to action calling out the most prominent need you may have here (ex. "Are you a writer? Help us with op-eds!").
Character limit: 100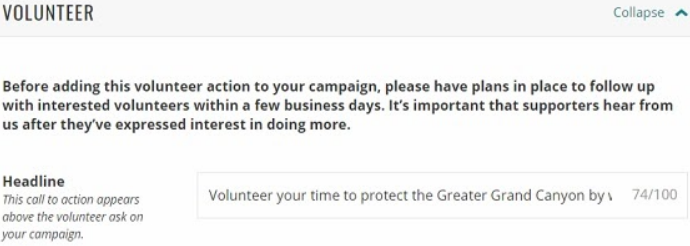
-
Description (optional): This is your greatest opportunity to customize the message (and give people the best idea of what they're singing up for), so be as specific as possible in what you're looking for here (ex. "we're looking for solid writers to help us write one op-ed advocating for keeping public lands public in Utah every month for the next six months").
Character limit: 300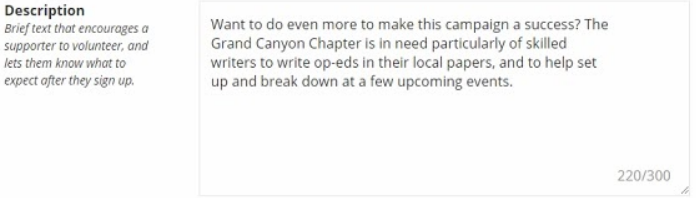
-
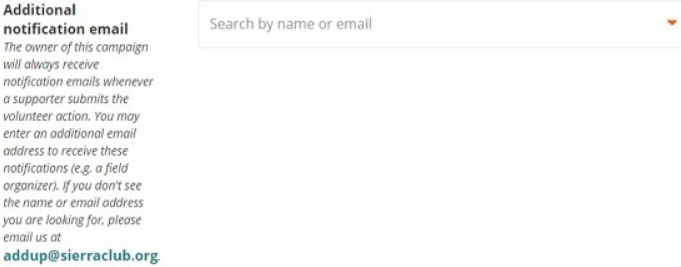
Additional Notification Email (optional): You as the campaign creator will get an automatic email whenever someone volunteers through AddUp. However, if you want other people on your campaign team to also get these same emails, you can add them here (They will have to be added as AddUp campaign managers first -- have them fill out this form to get them set up).
-
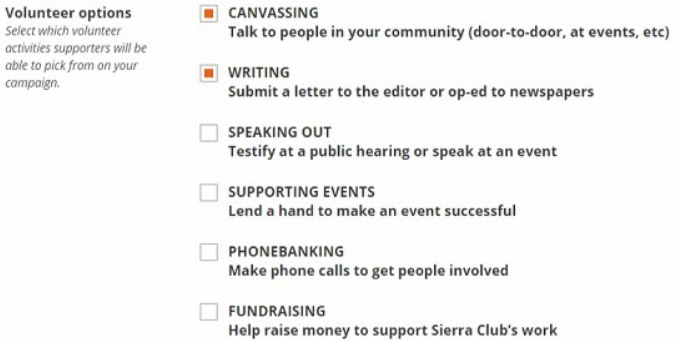
Volunteer options: Choose up to six of the available volunteer opportunities to recruit your volunteers into:
- Canvassing - Talk to people in your community (door-to-door, at events, etc).
- Writing - Submit a letter to the editor or op-ed to newspapers.
- Speaking Out - Testify at a public hearing or speak at an event.
- Supporting Events - Lend a hand to make an event successful.
- Phonebanking - Make phone calls to get people involved.
- Fundraising - Help raise money to support Sierra Club’s work.
-
You’re done! Click Save at the top.
Questions? Concerns? Email the AddUp team at addup@sierraclub.org
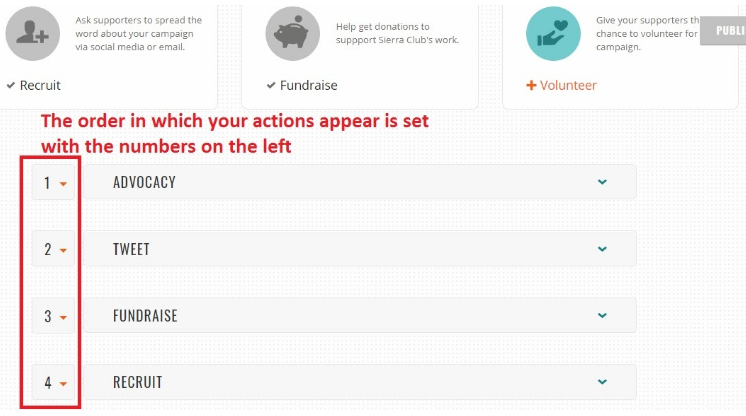
Yes! Once you've finished adding actions into your campaign, you’ll notice that there is a number assigned to each one in the upper lefthand corner. This is the order in which visitors will be asked to take your actions, so be sure that the most important actions you have is in position “1,” the second-most in position “2,” and so on. By clicking on the number on the left, you'll be given the option to change its position.
Please be sure that your most important action is in position 1!
Publishing Your Campaign
Depending on whether you are a Sierra Club Salesforce user or a general member, you will see one of two options alongside the “Save” button in the upper righthand corner: “Submit” or “Publish.”
If you see “Submit” highlighted in orange:
-
Click it to submit your campaign for approval. It will be directed to the AddUp team for review.
-
The AddUp team may send your campaign back to you with some questions or requested edits. Make the requested changes and continue this process until it is published.
-
If the AddUp team has no edits, they will publish your campaign and notify you within roughly a day that it is live.
Once published, you can access your campaign dashboard by going to Campaigns > My Campaigns and then clicking on your new campaign.
If you see “Publish” highlighted in orange: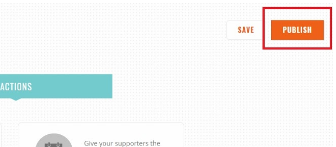
-
Click it to publish your campaign.
- If you want to share a preview of your campaign with your colleagues, you can always hit Publish, take a screenshot of your campaign, then click “End Campaign” on the Campaign Dashboard of your new AddUp campaign. You can launch it live again later.
- Once published, you can access your campaign dashboard by going to Campaigns > My Campaigns and then clicking on your new campaign.
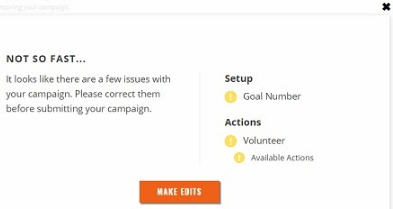
If you see that the “Submit” or “Publish” button is grayed out:
-
Click it to reveal unfinished aspects of your AddUp campaign that need completing before your campaign can be published.
-
Correct the items, until the button turns orange.
Note: Your campaign must have at least one action in order for it to go live. The section farther up this page covers how to add actions, if you need help with that.
Questions? Concerns? Email the AddUp team at addup@sierraclub.org
When you have no actions for supporters to take to support your campaign in the foreseeable future, then it's time to end your AddUp campaign (for now). However, you can always re-open it later (even months of years later) when new opportunities for your supporters to take action arise -- and you can still email all your "old" supporters through the Campaign Update feature to let them know about the new action(s)! This is the big advantage of re-using AddUp campaigns -- steadily building your Supporter count over time so you communicate with more and more people about your campaign.
-
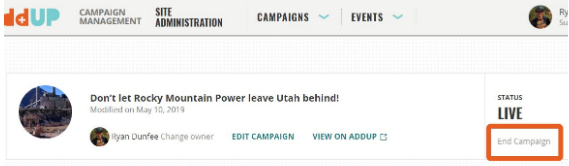
Go to your campaign's Dashboard from the AddUp campaign management homepage.
-
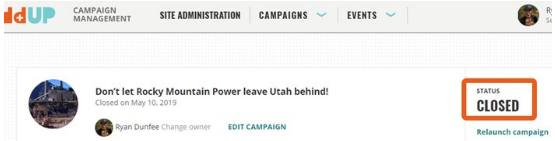
Under the "Status: live" section in the upper righthand corner, click End Campaign.
-
Now, you should notice that your campaign status is Closed.
-
You're done! Now that your campaign is closed, you can simply let it be, or re-open it if new opportunities for action pop up down the line by clicking the “Relaunch campaign” button.
When you have no actions for supporters to take to support your campaign in the foreseeable future, then it's time to end your AddUp campaign (for now). However, you can always re-open it later (even months of years later) when new opportunities for your supporters to take action arise -- and you can still email all your "old" supporters through the Campaign Update feature to let them know about the new action(s)! This is the big advantage of re-using AddUp campaigns -- steadily building your Supporter count over time so you communicate with more and more people about your campaign.
-
Go to your campaign's Dashboard from the AddUp campaign management homepage.
-
Under the "Status: live" section in the upper righthand corner, click End Campaign.
-
Now, you should notice that your campaign status is Closed.
-
You're done! Now that your campaign is closed, you can simply let it be, or re-open it if new opportunities for action pop up down the line by clicking the “Relaunch campaign” button.