AddUp How To Guide

At this point we’re hoping we’re all on the same page — organizing is important! It’s how we as activists, and everyday people, can effect big change in our local communities, environments, economies, and more. But just because organizing is important, doesn’t mean it’s always easy, or intuitive.
Chances are if you’ve landed on this page, you’re not just looking for any help — you’re specifically looking for help creating a Clean Energy For All campaign, action, or event on AddUp.org.
As you might have learned from Phase 1 of the Campaign Roadmap, Sierra Club highly recommends starting off your organizing efforts by (or returning often to the tactic of) hosting a Community Dialogue (virtual) event to listen and learn from your community, help you better build relationships, build power, and ultimately transition your community to 100% clean energy for all. Need help creating this event on AddUp? Follow the instructions below.
If you’re looking for more general information about AddUp, we recommend checking out the AddUp Help Site or reaching out to AddUp@SierraClub.org.
Frequently Asked Questions
How do I create a virtual Community Dialogue event on AddUp.org, if I already have an AddUp account?
-
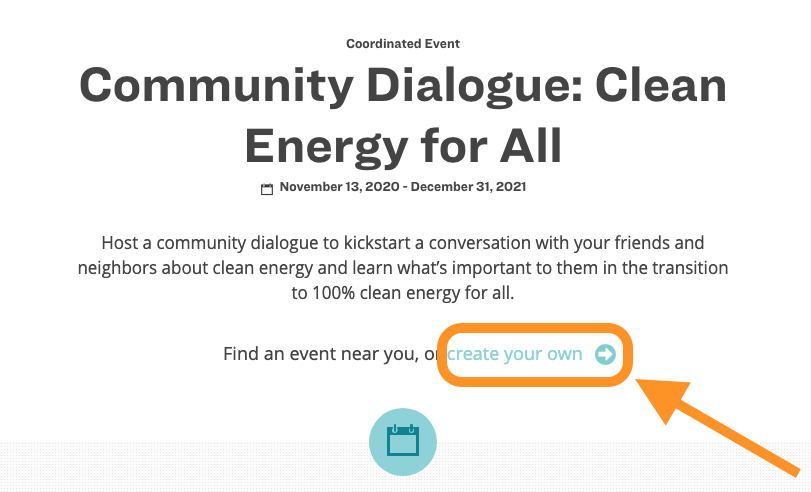
Click on “create your own” link and arrow, from the AddUp Coordinated Event page: “Community Dialogue: Clean Energy For All”.
-
You will then be prompted to log into your account.
Note: You can do this by either entering your email and password, or by using your Facebook credentials. Or if you think you have an account, but have forgotten your login information, click “Forgot Your Password?” to reset your password.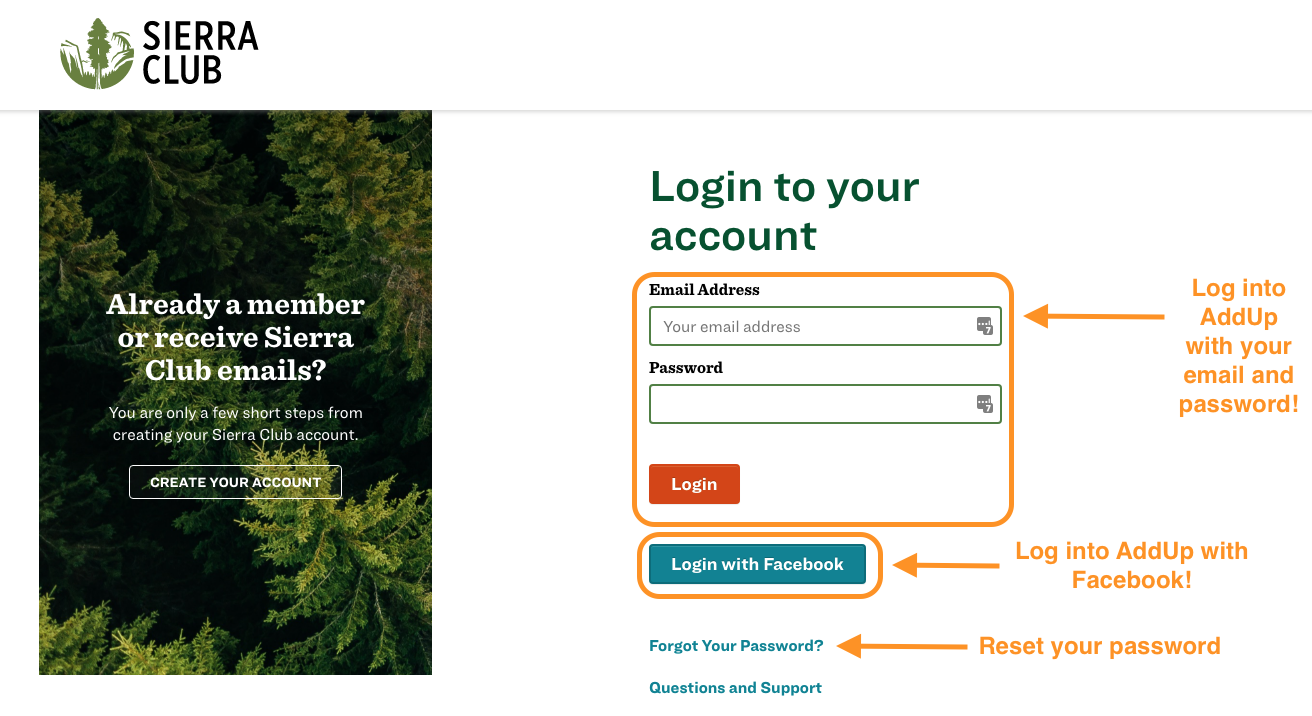
-
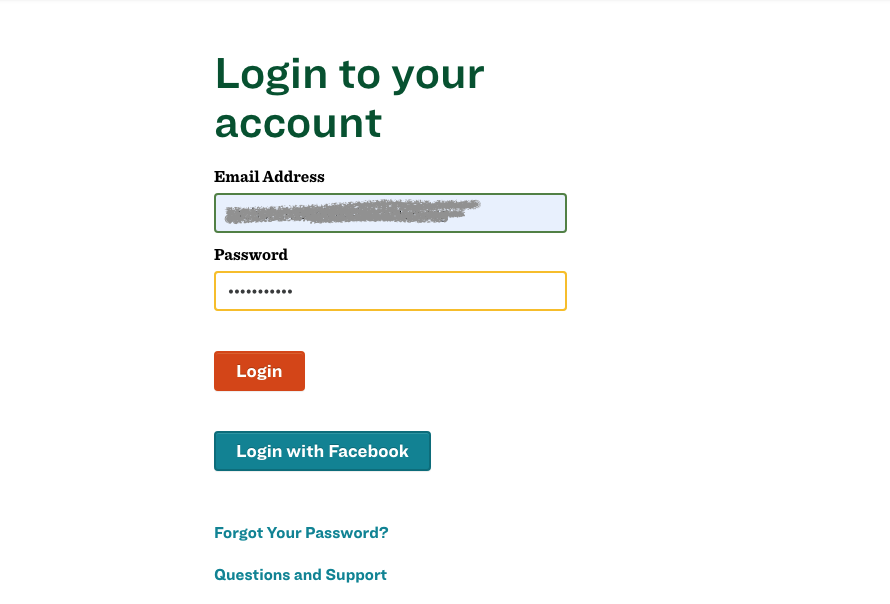
If you already have an account, please enter your login info now.
-
If you don’t already have an account, please follow the instructions below for “How do I create a virtual Community Dialogue event in AddUp from AddUp.org, if I do not already have an AddUp account?”?
-
-
If you logged in successfully, you should be redirected to the correct page! (It should look like this.)
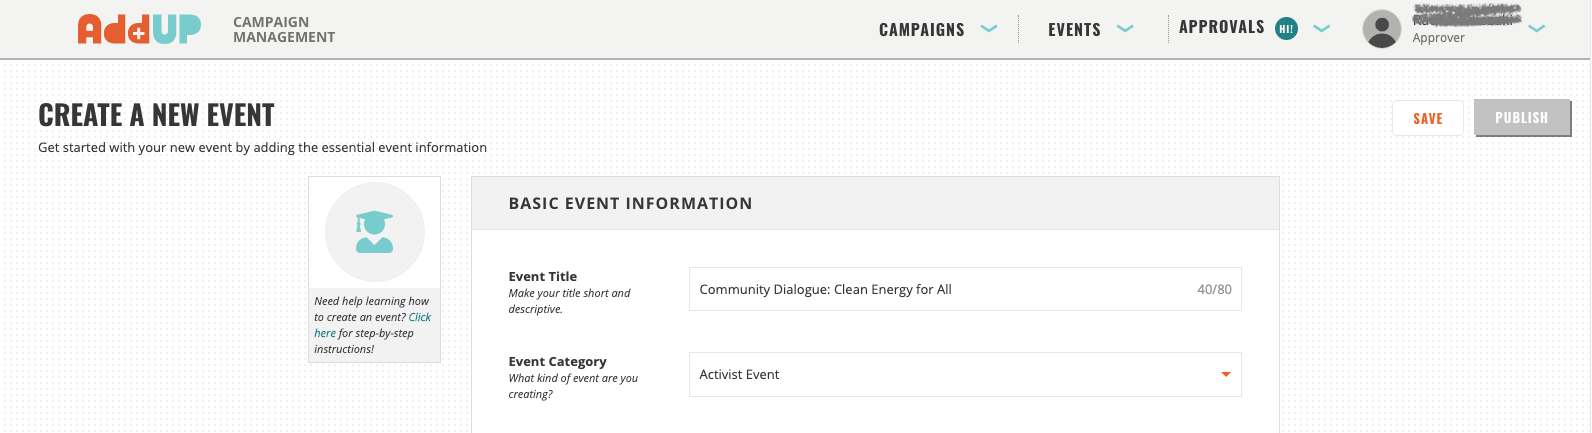
This will pre-fill many of the event fields with templated information that you’ll then want to modify to reflect the particulars of your community and of your particular community dialogue event. You’ll want to edit the following fields:-
Event Title: Change to something like “Community Dialogue: Clean Energy For All in Portland, Maine”.
-
Event Sponsor: Type “Ready For 100” into the search bar and select “Ready For 100 Distributed Volunteers” from the results. If you’re working with a Chapter or Group, you can search for and select it instead.
-
Event Location: Even though your event is virtual, you still want to add your city or town as the location — this will allow it to show up on the Ready For 100 map, and will help nearby potential attendees find it as well!
-
Webinar or Livestream URL: Put the URL/link for your Zoom call, GoToWebinar meeting, Google Hangout, etc. in here.
-
Start Date/Time & End Date/Time: Adjust to that of your particular event.
-
Time Zone: Select your particular time zone.
-
Event Summary: Tweak to mention your city or town, i.e. “Come join the conversation and help shape a healthier, more vibrant future for Portland!”.
-
Event Full Description: At a minimum, change each mention of “CITY” for your community, although we also recommend mentioning the local context of climate change and clean energy.
-
Post-Signup Instructions: This will get automatically emailed to each event attendee once they RSVP, so be sure to include the correct Zoom/meeting link, password, call-in number, and any other information attendees need to access and log into your virtual event.
-
You can edit the other fields as you see fit -- however at least customize the ones listed above for your event!
-
-
If you’re not ready to have your virtual event live yet, you can always hit “Save” at the top right and AddUp will save your event as a Draft you can continue to edit at any time.
If you’re ready for your event to be live and open to the public, click “Submit” at the top right. This will submit your event to the AddUp team, who should review and approve it, or respond with a request for edits, within 24 hours. -
Once your AddUp event is live, you can head here and then scroll down to “Managing & promoting a live AddUp event” to learn how to find your live event on AddUp, invite people to it, communicate with attendees, and more!
Watch our video (no provided captions) or read our instructions below.
-
Go to AddUp.org.
-
If you don’t have an AddUp account yet, click “Register” at the top. Those with AddUp accounts can click “Log In” and skip to Step 5.
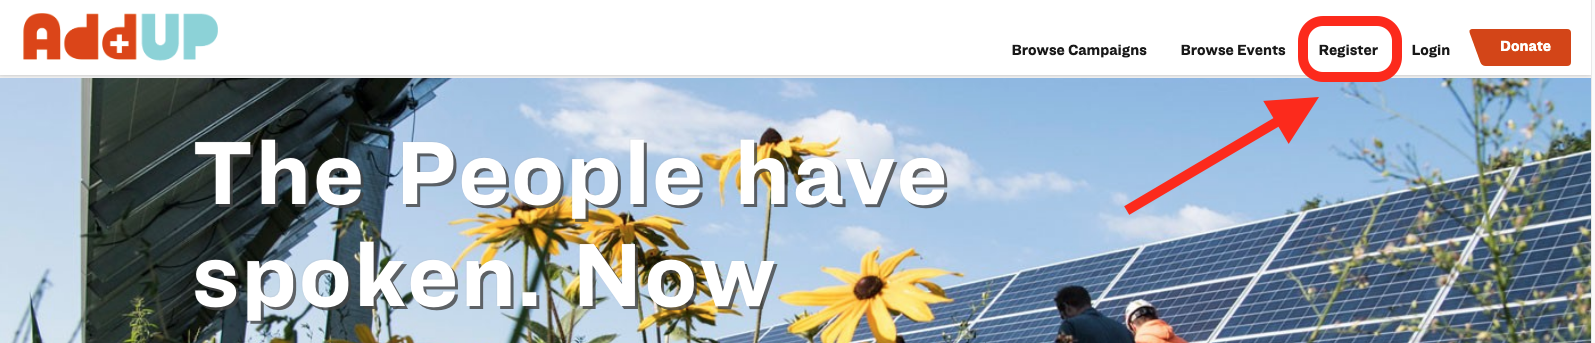
- Follow the instructions to create an AddUp/Sierra Club account. You will receive an email confirmation of your new account from member.care@sierraclub.org with the subject line “Welcome to Sierra Club’s MyAccount.”
-
Now that you’ve created an account, navigate back to AddUp.org.
-
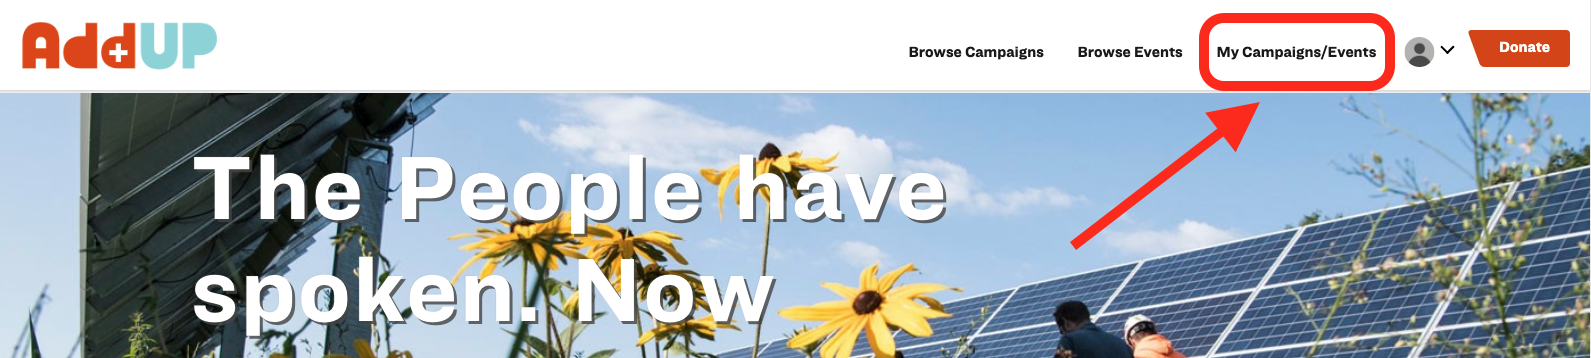
Click “Log In” at the top, then click “My Events” or “My Campaigns/Events” at the top navigation bar. This will redirect you to AddUp’s event creation homepage.
-
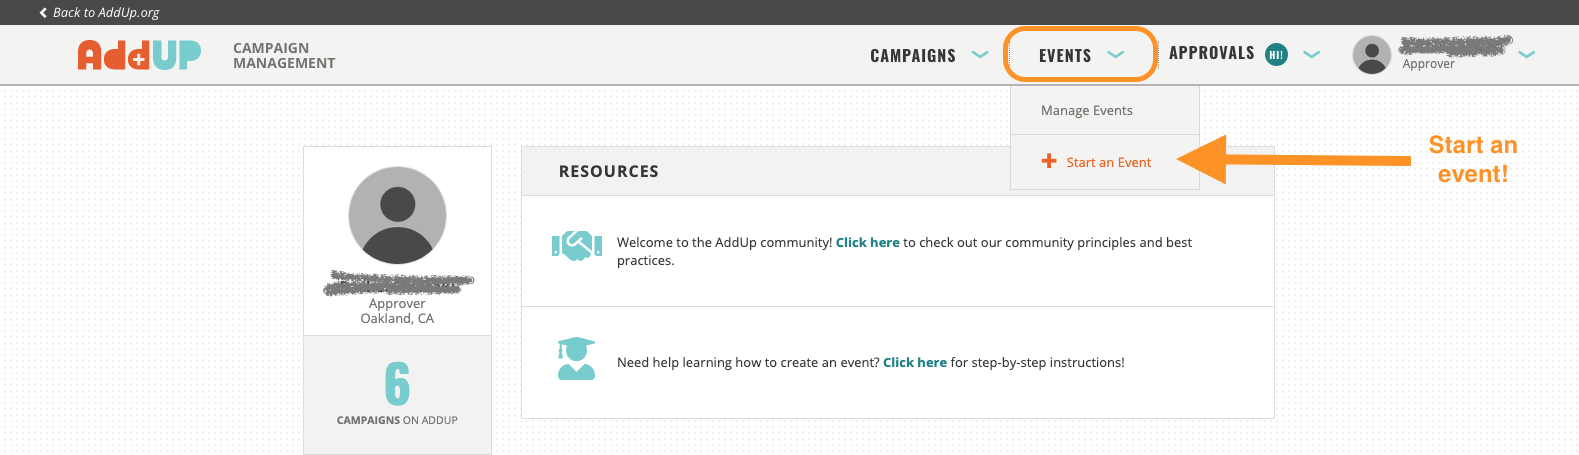
From this page, click “Events” at the top, then “+Start an event.” This will load the AddUp event creation page.
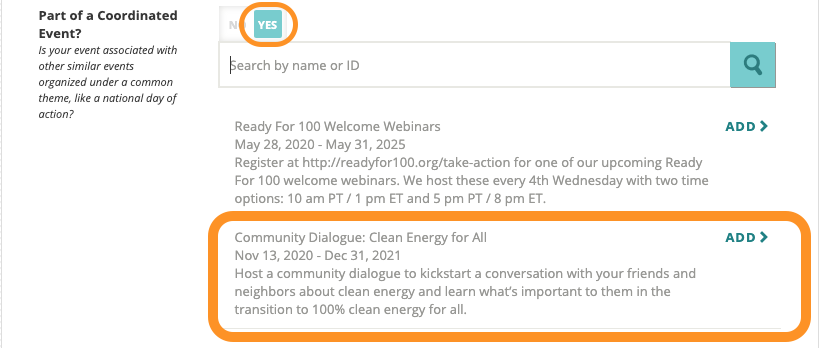
- On the event creation page, scroll down to “Part of a coordinated event?” and toggle it to “Yes.” Of the options that appear, click on “Community Dialogue: Clean Energy for All.”
-
This will pre-fill many of the event fields with templated information that you’ll then want to modify to reflect the particulars of your community and of your particular community dialogue event. You’ll want to edit the following fields:
-
Event Title: Change to something like “Community Dialogue: Clean Energy For All in Portland, Maine”.
-
Event Sponsor: Type “Ready For 100” into the search bar and select “Ready For 100 Distributed Volunteers” from the results. If you’re working with a Chapter or Group, you can search for and select it instead.
-
Event Location: Even though your event is virtual, you still want to add your city or town as the location — this will allow it to show up on the Ready For 100 map, and will help nearby potential attendees find it as well!
-
Webinar or Livestream URL: Put the URL/link for your Zoom call, GoToWebinar meeting, Google Hangout, etc. in here.
-
Start Date/Time & End Date/Time: Adjust to that of your particular event.
-
Time Zone: Select your particular time zone.
-
Event Summary: Tweak to mention your city or town, i.e. “Come join the conversation and help shape a healthier, more vibrant future for Portland!”.
-
Event Full Description: At a minimum, change each mention of “CITY” for your community, although we also recommend mentioning the local context of climate change and clean energy.
-
Post-Signup Instructions: This will get automatically emailed to each event attendee once they RSVP, so be sure to include the correct Zoom/meeting link, password, call-in number, and any other information attendees need to access and log into your virtual event.
-
You can edit the other fields as you see fit — however at least customize the ones listed above for your event!
-
-
If you’re not ready to have your virtual event live yet, you can always hit “Save” at the top right and AddUp will save your event as a Draft you can continue to edit at any time.
If you’re ready for your event to be live and open to the public, click “Submit” at the top right. This will submit your event to the AddUp team, who should review and approve it, or respond with a request for edits, within 24 hours. -
Once your AddUp event is live, you can head here and then scroll down to “Managing & promoting a live AddUp event” to learn how to find your live event on AddUp, invite people to it, communicate with attendees, and more!